MLOps project - part 2b: Machine Learning Workflow Orchestration using ZenML
Machine learning workflow orchestration using ZenML.


In the previous blog post, we discussed how to use Prefect as a workflow orchestration in our MLOps project. In this blog post, we will see how ZenML can help us do the same job and maybe other stuff. Let's get started.
ZenML
If you are an ML engineer or data scientist shipping models to production and jumbling many tools. It helps to do data, code, and model versioning. It also helps replicate production pipelines and monitoring models in production.

ZenML is an extensible, open-source MLOps framework for creating portable, production-ready MLOps pipelines. It's built for data scientists, ML Engineers, and MLOps Developers to collaborate as they develop to production. ZenML has simple, flexible syntax, is cloud- and tool-agnostic, and has interfaces/abstractions that are catered towards ML workflows. ZenML brings together all your favorite tools in one place so you can tailor your workflow to cater your needs.
Let's first get familiar with some of the ZenML's concepts briefly:
Pipelines and Steps: ZenML follows a pipeline-based workflow. A pipeline consists of a series of steps, organized in any order that makes sense for your use case. You can have multiple pipelines for different purposes. For example, a training pipeline to train and evaluate models and an inference pipeline to serve the model. We can use decorators such as @step and @pipeline to define steps and pipelines in ZenML.
Stacks, Components, and Stores: A Stack is the configuration of the underlying infrastructure and choices around how your pipeline will be run. For example, you can choose to run your pipeline locally or on the cloud by changing the stack you use.
In any Stack, there must be at least three basic Stack Components -
- Orchestrator: An Orchestrator is a workhorse that coordinates all the steps to run in a pipeline.
- Artifact Store: An Artifact Store is a component that houses all data that pass through the pipeline. Data in the artifact store are called artifacts.
- Metadata Store: A Metadata Store keeps track of all the bits of extraneous data from a pipeline run. It allows you to fetch specific steps from your pipeline run and their output artifacts in a post-execution workflow.
ZenML also has some other stack components that can help us scale up our stack to run elsewhere, for example, on a cloud with powerful GPUs for training or CPU's for deployment. You can check here for the full list of these stack components.
with ZenML, we can easily switch our stack from running on a local machine to running on the cloud with a single CLI command. Our code (steps and pipelines) stays the same. The only change is in the stack and its components. This is amazing!
Let's get back to our example and apply ZenML! In the previous blog post, we saw our simple pipeline:
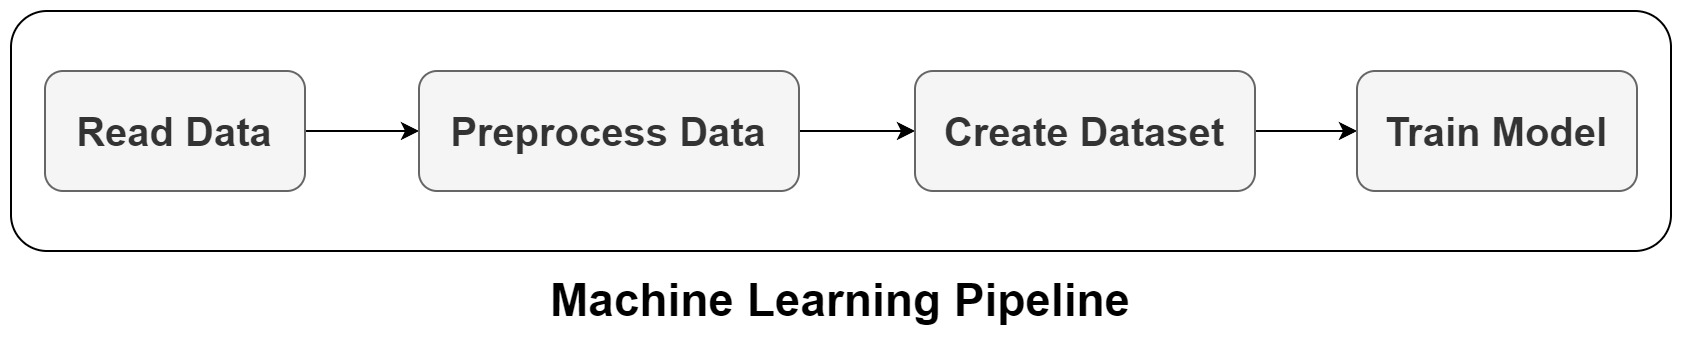
Your ML workflows may be a lot more complex. The performance of various models will need to be compared, they will need to be deployed in a production environment, and there may be extensive preprocessing that you do not want to repeat every time you train a model. ML pipelines are useful in this situation since they let us describe our workflows as a series of interchangeable modules.
ZenML's caching function, which is turned on by default, is another strong feature I liked. As long as the inputs, outputs, and parameters of steps and pipelines are tracked and versioned automatically by ZenML, the pipeline's steps won't be repeated when the pipeline is performed again. This drastically shortens the development period. You can enable/disable it for the whole pipeline or individual steps.
Let's start adding ZenML to our code in a local development environment.
ZenML on Local Development Environment
You first need to install ZenML:
pip install zenml
pip install "zenml[stacks]==0.13.1"
Once the installation is completed, you can go ahead and create your first ZenML repository for your project:
zenml init
Then, we need to define each step as a ZenML Pipeline Step simply by having several functions with ZenML's @step Python decorator.
We can also use ZenML's @pipeline decorator to define a pipeline and connect all the steps into an ML pipeline.
One thing that I spent some time was the input and output type definition for steps. Especially custom types like the tokenizer. We need to tell ZenML somehow about this custom type. There is a solution called Materializer in ZenML. You can see the defined custom materializer for our TensorFlow Tokenizer and its use in the following code sections.
You need to pass the materializer to the step via .with_return_materializers({"tokenizer": TokenizerMaterializer}) in the pipeline definition. You will see this in a few moments.
You can save the tokenizer in the create_dataset step without returning it, but I do this just to show you how you can have a custom output from a step.
In addition, we need to integrate MLflow in ZenML for experiment tracking. It is a bit different from how we did it with Prefect. MLflow can handle various ML lifecycle steps, such as experiment tracking, code packaging, model deployment, and more. In this lesson, we will focus on the MLflow Tracking component, but we will learn about other MLflow features in later posts.
First, install MLflow ZenML integration:
zenml integration install mlflow -y
Then, by adding an @enable_mlflow decorator on top of the function, ZenML automatically initializes MLflow, and we can log what we want. In this post, we do not do hyperparameter tuning and set the hyperparameters inside the training step. At the time of writing this blog post, which is ZenML 0.13.1, there is no straight way to do hyperparameter tuning in ZenML. If you use the @enable_mlflow decorator, it will consider the whole step as one run. so you cannot have multiple MLflow runs in one single step. You cannot also pass hyperparameters as step arguments as they are not the output of a previous step. The ZenML team is working on this feature, and I hope to have this feature soon.
You can also use MLflow without this decorator and in a normal way, like what we did in the previous post, by using the following two lines in the training step:
mlflow.set_tracking_uri(<tracking uri>)
mlflow.set_experiment("customer-sentiment-analysis")
You can get the tracking URI by using zenml experiment-tracker describe. This way, you can use MLflow normally without letting ZenML handle it.
To run our MLflow pipelines with ZenML, we first need to add MLflow into our ZenML MLOps stack. We first register a new experiment tracker with ZenML and then add it to our current stack. To set the tracking_uri for MLflow in ZenML, you need to do it as follows, which is a bit different from what we did before and how you do it with pure MLflow. Also, setting the experiment name in ZenML 0.13.1 is not possible, and it uses a default name which is the name of the function you use for training. We will see it in a few moments. I hope they add it in future versions.
# Register the MLflow experiment tracker
zenml experiment-tracker register mlflow_tracker --flavor=mlflow --tracking_uri="sqlite:///mlflow.db"

# Add the MLflow experiment tracker into our default stack
zenml stack update default -e mlflow_tracker
After all of the above steps, our local stack, named Default, would be as the following image:
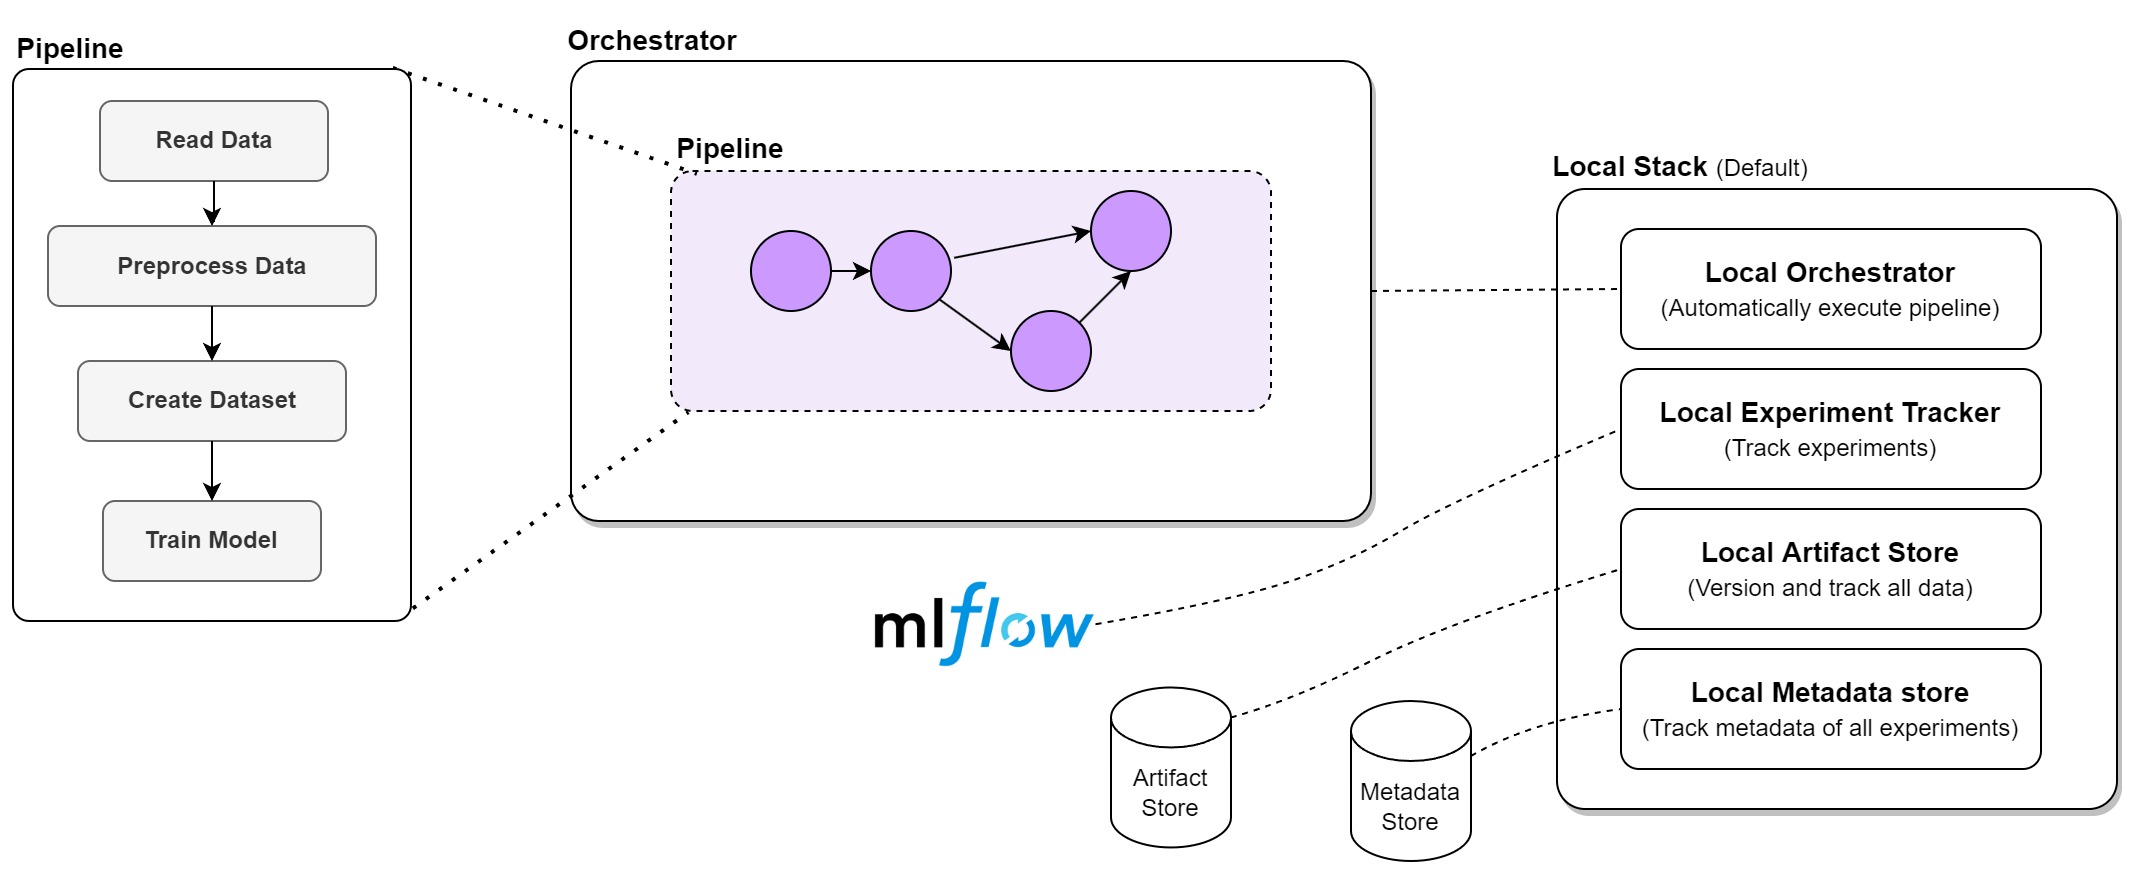
Any MLOps stack's foundation comprises artifact stores, metadata stores, and orchestrators since they allow us to save, distribute, and reproduce our work. Without them, it's simple to lose sight of the specific steps to develop our present ML pipelines.
All artifacts are automatically stored in an Artifact Store in our ML process. By default, this is just a location in your local file system, but we can enable ZenML to store this information in a cloud bucket instead, such as an Amazon S3 or Google Cloud storage bucket.
ZenML automatically stores Metadata, such as the item's location in a Metadata Store, together with the artifact itself. By default, this is an SQLite database on your local computer, but we could just as easily replace it with a cloud service. The orchestrator, which manages your machine learning pipelines, is a crucial part of any MLOps architecture. The orchestrator offers a setting that is ready to carry out the pipeline's steps to accomplish this. Additionally, it ensures that the pipeline's steps are only carried out once all of its inputs, which are the results of earlier processes, have been made available.
In this project, we also added MLFlow as the experiment tracker to our stack.
As I mentioned, when you use @enable_mlflow decorator for a step, it will be one single run, and you cannot have multiple runs in that step. You need to call the step multiple times if you want to test different sets of hyperparameters and do a hyperparameter search. The other problem you may face is that you cannot pass parameters to a step if it is not the result of a previous step. You can do the same trick as this example.
Our final code would be like the following:
# train_dl_zenml.py file

import numpy as np
import pandas as pd
import os
import nltk
import re
from nltk.corpus import stopwords
from nltk.stem.porter import PorterStemmer
import tensorflow as tf
from tensorflow.keras.preprocessing.text import Tokenizer
from tensorflow.keras.preprocessing.sequence import pad_sequences
from sklearn.model_selection import train_test_split
import mlflow
import pickle
from zenml.steps import step, Output
from zenml.pipelines import pipeline
from zenml.artifacts import DataArtifact
from zenml.io import fileio
from zenml.materializers.base_materializer import BaseMaterializer
from zenml.integrations.mlflow.mlflow_step_decorator import enable_mlflow
from zenml.config.docker_configuration import DockerConfiguration
from zenml.steps import step, ResourceConfiguration
from typing import Type

nltk.download('stopwords')
DATA_PATH = "data/Womens Clothing E-Commerce Reviews.csv"


# materializer for TF tokenizer (custom) inputs and outputs
class TokenizerMaterializer(BaseMaterializer):
    ASSOCIATED_TYPES = (Tokenizer,)
    ASSOCIATED_ARTIFACT_TYPES = (DataArtifact,)

    def handle_input(self, data_type: Type[Tokenizer]) -> Tokenizer:
        """Read from artifact store"""
        super().handle_input(data_type)
        with fileio.open(os.path.join(self.artifact.uri, 'tokenizer.pickle'), 'rb') as f:
            tokenizer = pickle.load(f)
        return tokenizer

    def handle_return(self, tokenizer: Tokenizer) -> None:
        """Write to artifact store"""
        super().handle_return(tokenizer)
        with fileio.open(os.path.join(self.artifact.uri, 'tokenizer.pickle'), 'wb') as f:
            pickle.dump(tokenizer, f, protocol=pickle.HIGHEST_PROTOCOL)


## data loading
@step
def read_data() -> pd.DataFrame:
    data = pd.read_csv(DATA_PATH, index_col =[0])
    print("Data loaded.\n\n")
    return data

## preprocess text
@step
def preprocess_data(
    data: pd.DataFrame,
    ) -> Output(corpus=np.ndarray, y=np.ndarray):
    data = data[~data['Review Text'].isnull()]  #Dropping columns which don't have any review
    X = data[['Review Text']]
    X.index = np.arange(len(X))

    y = data['Recommended IND'].values

    corpus =[]
    for i in range(len(X)):
        review = re.sub('[^a-zA-z]',' ',X['Review Text'][i])
        review = review.lower()
        review = review.split()
        ps = PorterStemmer()
        review =[ps.stem(i) for i in review if not i in set(stopwords.words('english'))]
        review =' '.join(review)
        corpus.append(review)

    print("Data preprocessed.\n\n")

    return np.array(corpus), y

# tokenization and dataset creation
@step
def create_dataset(
    corpus: np.ndarray,
    y: np.ndarray
    ) -> Output(X_train=np.ndarray, X_test=np.ndarray, y_train=np.ndarray, y_test=np.ndarray, tokenizer=Tokenizer):

    tokenizer = Tokenizer(num_words = 3000)
    tokenizer.fit_on_texts(corpus)

    sequences = tokenizer.texts_to_sequences(corpus)
    padded = pad_sequences(sequences, padding='post')

    X_train, X_test, y_train, y_test = train_test_split(padded, y, test_size = 0.2, random_state = 42)

    print("Dataset created.\n\n")
    return X_train, X_test, y_train, y_test, tokenizer

@enable_mlflow
@step
def train_model(
    X_train: np.ndarray,
    y_train: np.ndarray,
    X_test: np.ndarray,
    y_test: np.ndarray,
    tokenizer: Tokenizer
    ) -> None:

    mlflow.tensorflow.autolog()

    embedding_dim = 32
    batch_size = 64

    # model definition
    model = tf.keras.Sequential([
        tf.keras.layers.Embedding(3000, embedding_dim),
        tf.keras.layers.GlobalAveragePooling1D(),
        tf.keras.layers.Dense(6, activation='relu'),
        tf.keras.layers.Dense(1, activation='sigmoid')
    ])

    ## training
    num_epochs = 2
    callback = tf.keras.callbacks.EarlyStopping(
        monitor="val_loss",
        min_delta=0,
        patience=2,
        verbose=0,
        mode="auto",
        baseline=None,
        restore_best_weights=False,
    )

    model.compile(loss='binary_crossentropy',optimizer='adam',metrics=['accuracy'])

    mlflow.set_tag("developer", "Isaac")
    mlflow.set_tag("algorithm", "Deep Learning")
    mlflow.log_param("train-data", "Womens Clothing E-Commerce Reviews")
    mlflow.log_param("embedding-dim", embedding_dim)

    print("Fit model on training data")
    model.fit(
        X_train,
        y_train,
        batch_size=batch_size,
        epochs=num_epochs,
        callbacks=callback,
        # We pass some validation for
        # monitoring validation loss and metrics
        # at the end of each epoch
        validation_data=(X_test, y_test),
    )

    ## save model and tokenizer
    mlflow.keras.log_model(model, 'models/model_dl')

    with open('tf_tokenizer.pickle', 'wb') as handle:
        pickle.dump(tokenizer, handle, protocol=pickle.HIGHEST_PROTOCOL)

    mlflow.log_artifact(local_path="tf_tokenizer.pickle", artifact_path="tokenizer_pickle")

    print("Model training completed.\n\n")

@pipeline
def training_pipeline(
    reading_data,
    preprocessing_data,
    creating_dataset,
    training_model,
):
    data = reading_data()
    corpus, y = preprocessing_data(data)
    X_train, X_test, y_train, y_test, tokenizer = creating_dataset(corpus, y)
    training_model(X_train, y_train, X_test, y_test, tokenizer)

if __name__ == '__main__':

    training_pipeline(
        reading_data=read_data(),
        preprocessing_data=preprocess_data(),
        creating_dataset=create_dataset().with_return_materializers({"tokenizer": TokenizerMaterializer}),
        training_model=train_model(),
    ).run()
You can then run the code using the following command, which runs the pipeline on the local stack:
python train_dl_zenml.py
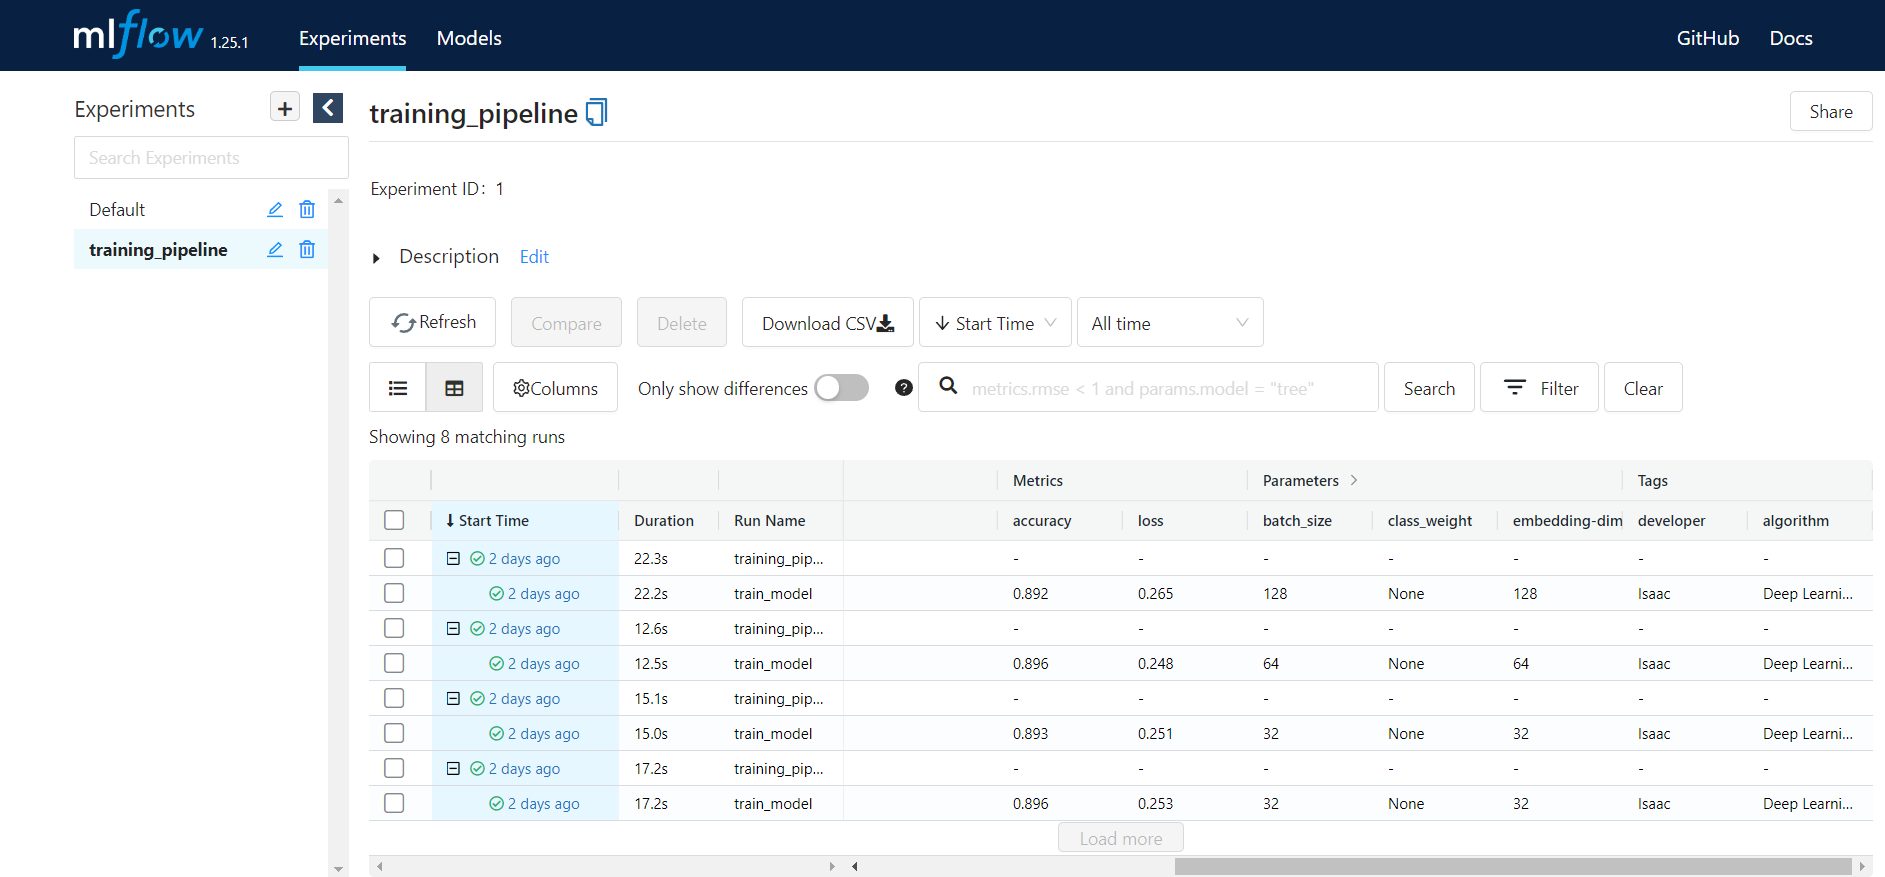
It will run the pipeline on the local Default stack. You can run MLflow UI using the following command:
mlflow ui --backend-store-uri sqlite:///mlflow.db
Here is the result of training for different set of hyperparameters on MLflow UI:
Running the pipeline on the local machine is easy. But what if we want to run our pipeline on the cloud to be able to use powerful computation there? What if our training step needs a powerful GPU? We can easily create a ZenML stack on a cloud environment like Google Cloud and switch the stack to run the pipeline without changing our code and by just using a single command. That's amazing. Isn't it?!! Let's see how to do this.
ZenML on GCP
Now let's see how to deploy this pipeline on Cloud. I will do it on GCP here, but other clouds are almost the same.
You can have a simple MLOps stack ready for running your machine learning workloads on GCP. To do this, you can follow the steps here. It uses Terraform and sets up the following resources:
- A Vertex AI enabled workspace as an orchestrator to which you can submit your pipelines.
- A service account with all the necessary permissions to execute your pipelines.
- A GCS bucket as an artifact store, which can be used to store all your ML artifacts like the model, checkpoints, etc.
- A CloudSQL instance as a metadata store that is essential to track all your metadata and its location in your artifact store.
- A Container Registry repository as container registry for hosting your docker images.
- A secrets manager enabled for storing your secrets.
- An optional MLflow Tracking server deployed on a GKE cluster as an experiment tracker.
Note that the terraform will create the required service account and enable required APIs on GCP.
Follow the steps below to build the infrastructure for running your pipeline on GCP using vertex-ai:
-
Create a new project on GCP
-
Set project in gcloud cli
gcloud config set project <new project id>
- Pull zenml vertex-ai recipe
zenml stack recipe pull vertex-ai
-
Customize your deployment by editing the default values in the
locals.tffile likeproject_id,region,gcsname,prefix, etc. -
Add your secret information like keys and passwords into the
values.tfvars.jsonfile, which is not committed and only exists locally. -
Deploy using zenml
zenml stack recipe deploy vertex-ai
- Create the ZenML stack. You may need to install gcp integration using
zenml integration install gcptoo.
zenml stack import vertex-ai zenml_stack_recipes/vertex-ai/vertex_stack_2022-08-26T07_02.yml
- You should now create a secret for the CloudSQL instance that will allow ZenML to connect to it. Use the following command:
zenml secrets-manager secret register gcp_mysql_secret --schema=mysql --user=<DB_USER> --password=<PWD> \
  --ssl_ca=@</PATH/TO/DOWNLOADED/SERVER-CERT> \
  --ssl_cert=@</PATH/TO/DOWNLOADED/CLIENT-CERT> \
  --ssl_key=@</PATH/TO/DOWNLOADED/CLIENT-KEY>
The values for the username and password can be obtained by running the following commands inside your recipe directory. (run them inside the folder with .tf files)
terraform output metadata-db-username
terraform output metadata-db-password
For the certificates, visit the Google Cloud Console to create a certificate and download the files to your system.
- You can destroy the deployed infrastructure using:
zenml stack recipe destroy vertex-ai
zenml stack recipe clean
- You can also delete the stack using:
zenml stack delete <STACK_NAME>
- You can also delete components by:
zenml <STACK_COMPONENT> delete <STACK_COMPONENT_NAME>
In our case:
zenml artifact-store delete gcs_artifact_store
zenml container-registry delete gcr_container_registry
zenml metadata-store delete cloudsql_metadata_store
zenml orchestrator delete vertex_ai_orchestrator
zenml secrets-manager delete gcp_secrets_manager
zenml experiment-tracker delete gke_mlflow_experiment_tracker
Note: If you provisioned infrastructure related to the stack, make sure to deprovision it using zenml stack down --force before unregistering the stack.
Our stack, named vertex-ai, would be as follows:
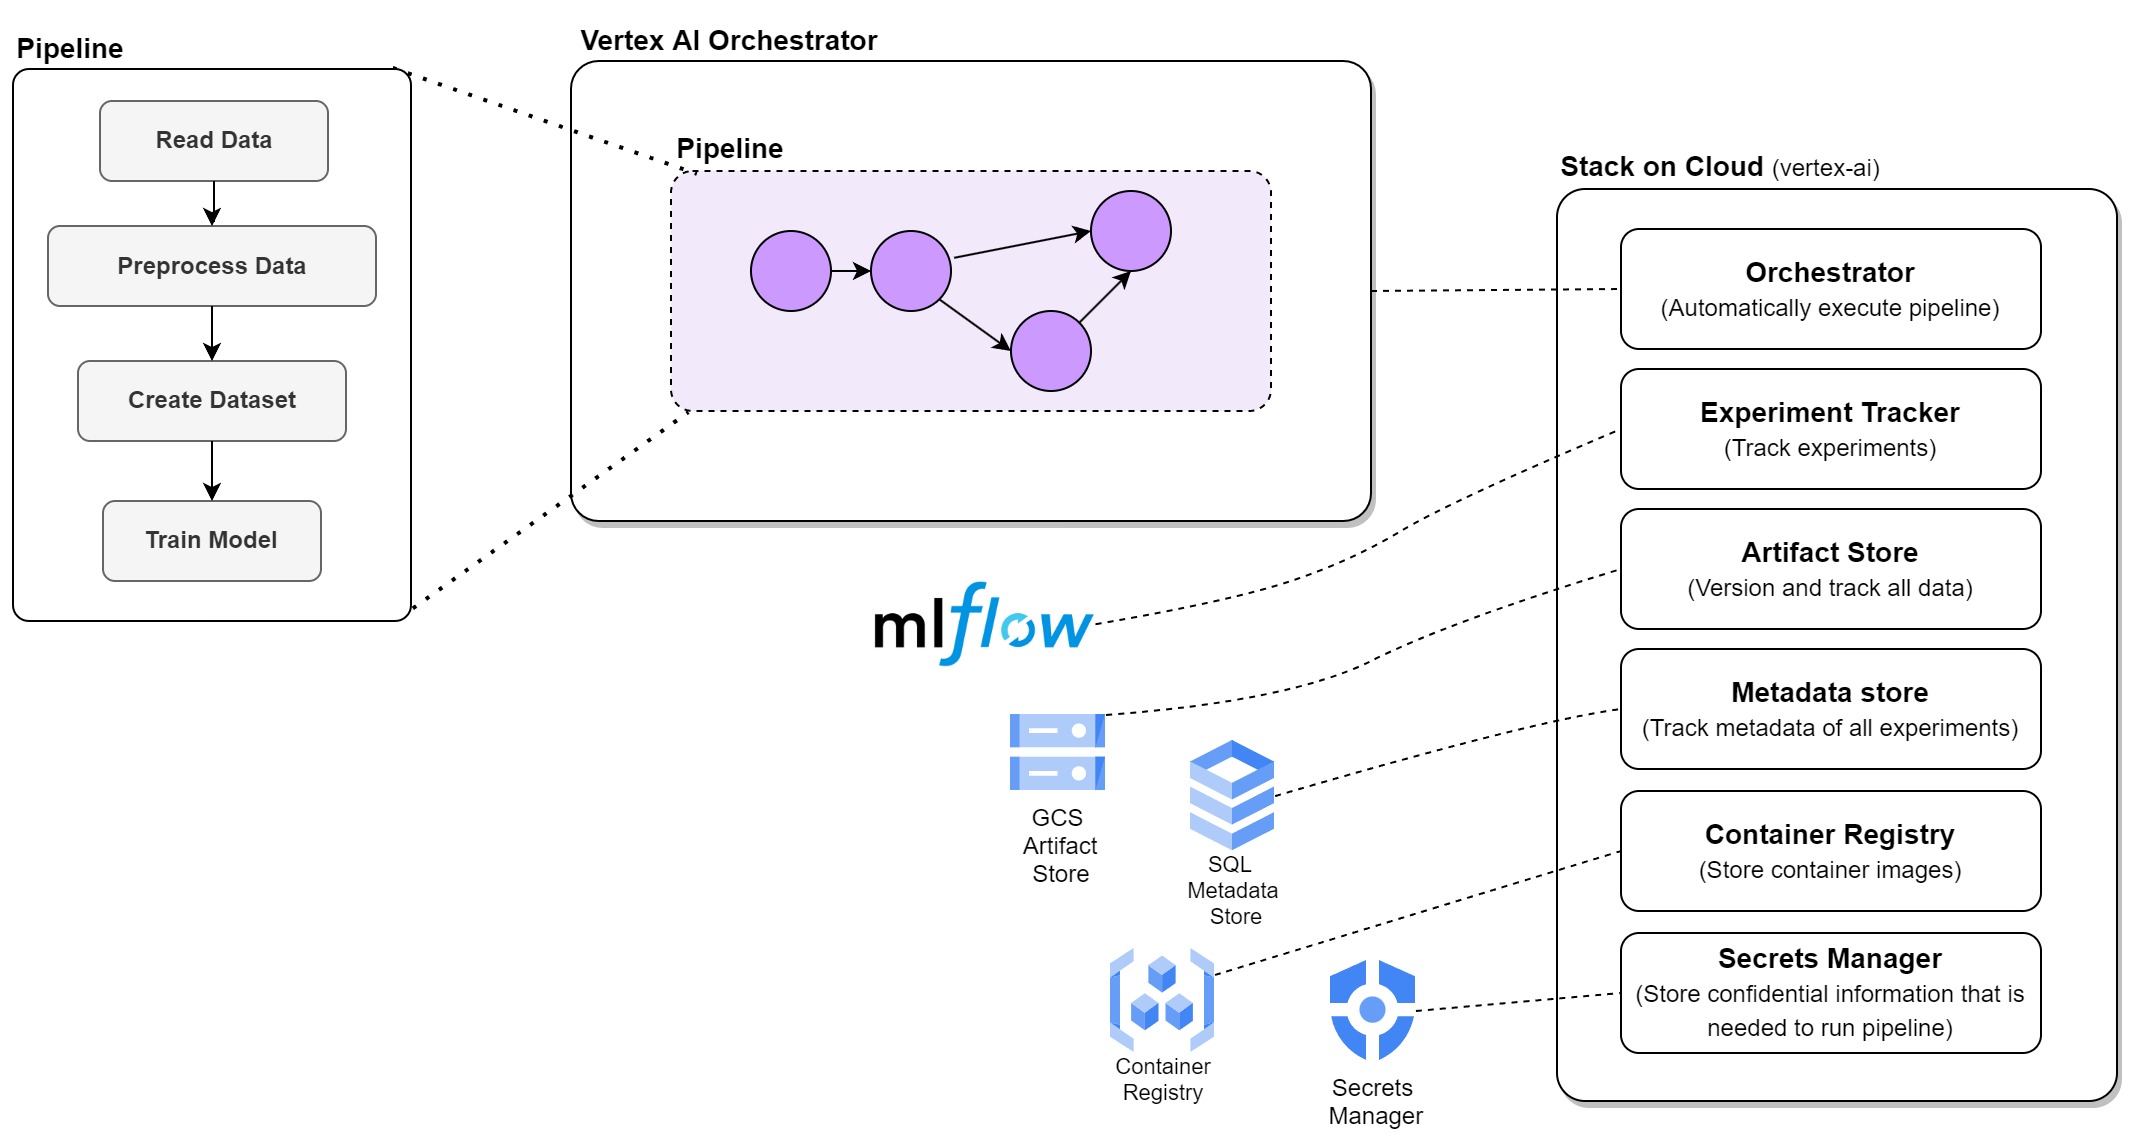
The current MLflow integration in ZenML seems to use an SQLite database hosted on the VM where MLflow runs, and there is no remote backend store, only a remote artifact store. If you check your VM instances on Google Cloud Console, you will see a VM running all the time. This can be replaced with a serverless service like Cloud Run, and a SQL database can be added for the backend store for MLflow. They are working on it and hope to see these additions in the future releases of ZenML.
Then you can use zenml stack list to see the list of stacks. If the newly created stack (vertex-ai) is not active, use zenml stack set vertex-ai to activate it.

You then should be able to run your pipeline on the new stack and on GCP. Note that you may need to do python <path-to-python-env>\Scripts\pywin32_postinstall.py -install if you see any error related to that. Also, make sure you have docker installed and running.
The other point you need to take care of if you want to run your pipeline on the cloud is the package requirements for your code. One way is to create a requirements.txt file in your repo and set the path to it in your code. The other way is to pass these requirements as a list to DockerConfiguration. Check here to learn more.
I do it as follows:
.
.
.
docker_config = DockerConfiguration(
    requirements=[
        "nltk",
        "tensorflow==2.9.1",
        "scikit-learn"
    ],
    dockerignore="./.dockerignore"
)
.
.
.
@pipeline(docker_configuration=docker_config)
.
.
.
You can also config hardware requirements for each step using the @step decorator as follows:
from zenml.steps import step, ResourceConfiguration

@step(resource_configuration=ResourceConfiguration(cpu_count=8, gpu_count=2, memory="16GB"))
def my_step(...) -> ...:
    ...
And here are the attributes of the ResourceConfiguration:
Attributes:
    cpu_count: The amount of CPU cores that should be configured.
    gpu_count: The amount of GPUs that should be configured.
    memory: The amount of memory that should be configured.
Our final code would be like this:
# train_dl_zenml.py file

import numpy as np
import pandas as pd
import os
import nltk
import re
from nltk.corpus import stopwords
from nltk.stem.porter import PorterStemmer
import tensorflow as tf
from tensorflow.keras.preprocessing.text import Tokenizer
from tensorflow.keras.preprocessing.sequence import pad_sequences
from sklearn.model_selection import train_test_split
import mlflow
import pickle
from zenml.steps import step, Output
from zenml.pipelines import pipeline
from zenml.artifacts import DataArtifact
from zenml.io import fileio
from zenml.materializers.base_materializer import BaseMaterializer
from zenml.integrations.mlflow.mlflow_step_decorator import enable_mlflow
from zenml.config.docker_configuration import DockerConfiguration
from zenml.steps import step, ResourceConfiguration
from typing import Type

nltk.download('stopwords')
DATA_PATH = "data/Womens Clothing E-Commerce Reviews.csv"

# docker config
docker_config = DockerConfiguration(
    requirements=[
        "nltk",
        "tensorflow==2.9.1",
        "scikit-learn"
    ],
    dockerignore="./.dockerignore"
    )

# materializer for TF tokenizer (custom) inputs and outputs
class TokenizerMaterializer(BaseMaterializer):
    ASSOCIATED_TYPES = (Tokenizer,)
    ASSOCIATED_ARTIFACT_TYPES = (DataArtifact,)

    def handle_input(self, data_type: Type[Tokenizer]) -> Tokenizer:
        """Read from artifact store"""
        super().handle_input(data_type)
        with fileio.open(os.path.join(self.artifact.uri, 'tokenizer.pickle'), 'rb') as f:
            tokenizer = pickle.load(f)
        return tokenizer

    def handle_return(self, tokenizer: Tokenizer) -> None:
        """Write to artifact store"""
        super().handle_return(tokenizer)
        with fileio.open(os.path.join(self.artifact.uri, 'tokenizer.pickle'), 'wb') as f:
            pickle.dump(tokenizer, f, protocol=pickle.HIGHEST_PROTOCOL)


## data loading
@step
def read_data() -> pd.DataFrame:
    data = pd.read_csv(DATA_PATH, index_col =[0])
    print("Data loaded.\n\n")
    return data

## preprocess text
@step(resource_configuration=ResourceConfiguration(cpu_count=16, memory="16GB"))
def preprocess_data(
    data: pd.DataFrame,
    ) -> Output(corpus=np.ndarray, y=np.ndarray):
    data = data[~data['Review Text'].isnull()]  #Dropping columns which don't have any review
    X = data[['Review Text']]
    X.index = np.arange(len(X))

    y = data['Recommended IND'].values

    corpus =[]
    for i in range(len(X)):
        review = re.sub('[^a-zA-z]',' ',X['Review Text'][i])
        review = review.lower()
        review = review.split()
        ps = PorterStemmer()
        review =[ps.stem(i) for i in review if not i in set(stopwords.words('english'))]
        review =' '.join(review)
        corpus.append(review)

    print("Data preprocessed.\n\n")

    return np.array(corpus), y

# tokenization and dataset creation
@step(resource_configuration=ResourceConfiguration(cpu_count=8, memory="16GB"))
def create_dataset(
    corpus: np.ndarray,
    y: np.ndarray
    ) -> Output(X_train=np.ndarray, X_test=np.ndarray, y_train=np.ndarray, y_test=np.ndarray, tokenizer=Tokenizer):

    tokenizer = Tokenizer(num_words = 3000)
    tokenizer.fit_on_texts(corpus)

    sequences = tokenizer.texts_to_sequences(corpus)
    padded = pad_sequences(sequences, padding='post')

    X_train, X_test, y_train, y_test = train_test_split(padded, y, test_size = 0.2, random_state = 42)

    print("Dataset created.\n\n")
    return X_train, X_test, y_train, y_test, tokenizer

@enable_mlflow
@step(resource_configuration=ResourceConfiguration(cpu_count=8, memory="16GB"))
def train_model(
    X_train: np.ndarray,
    y_train: np.ndarray,
    X_test: np.ndarray,
    y_test: np.ndarray,
    tokenizer: Tokenizer
    ) -> None:

    mlflow.tensorflow.autolog()

    embedding_dim = 32
    batch_size = 64

    # model definition
    model = tf.keras.Sequential([
        tf.keras.layers.Embedding(3000, embedding_dim),
        tf.keras.layers.GlobalAveragePooling1D(),
        tf.keras.layers.Dense(6, activation='relu'),
        tf.keras.layers.Dense(1, activation='sigmoid')
    ])

    ## training
    num_epochs = 2
    callback = tf.keras.callbacks.EarlyStopping(
        monitor="val_loss",
        min_delta=0,
        patience=2,
        verbose=0,
        mode="auto",
        baseline=None,
        restore_best_weights=False,
    )

    model.compile(loss='binary_crossentropy',optimizer='adam',metrics=['accuracy'])

    mlflow.set_tag("developer", "Isaac")
    mlflow.set_tag("algorithm", "Deep Learning")
    mlflow.log_param("train-data", "Womens Clothing E-Commerce Reviews")
    mlflow.log_param("embedding-dim", embedding_dim)

    print("Fit model on training data")
    model.fit(
        X_train,
        y_train,
        batch_size=batch_size,
        epochs=num_epochs,
        callbacks=callback,
        # We pass some validation for
        # monitoring validation loss and metrics
        # at the end of each epoch
        validation_data=(X_test, y_test),
    )

    ## save model and tokenizer
    mlflow.keras.log_model(model, 'models/model_dl')

    with open('tf_tokenizer.pickle', 'wb') as handle:
        pickle.dump(tokenizer, handle, protocol=pickle.HIGHEST_PROTOCOL)

    mlflow.log_artifact(local_path="tf_tokenizer.pickle", artifact_path="tokenizer_pickle")

    print("Model training completed.\n\n")

@pipeline(docker_configuration=docker_config)
def training_pipeline(
    reading_data,
    preprocessing_data,
    creating_dataset,
    training_model,
):
    data = reading_data()
    corpus, y = preprocessing_data(data)
    X_train, X_test, y_train, y_test, tokenizer = creating_dataset(corpus, y)
    training_model(X_train, y_train, X_test, y_test, tokenizer)

if __name__ == '__main__':

    training_pipeline(
        reading_data=read_data(),
        preprocessing_data=preprocess_data(),
        creating_dataset=create_dataset().with_return_materializers({"tokenizer": TokenizerMaterializer}),
        training_model=train_model(),
    ).run()
Then you can run your pipeline:
python train_dl_zenml.py
This will run the pipeline on Vertex AI, and you should be able to see all the steps executed successfully on the Vertex AI pipelines section on GCP. It will be as the following image:

You can do many things with steps. You can read data from different sources like GCS or BigQuery, or any other source. You can do data processing and ETL using different tools like Spark. You can train even huge deep learning models using GPU on Vertex.
To see the MLflow UI, you can use the zenml experiment-tracker describe and will see sth like this:
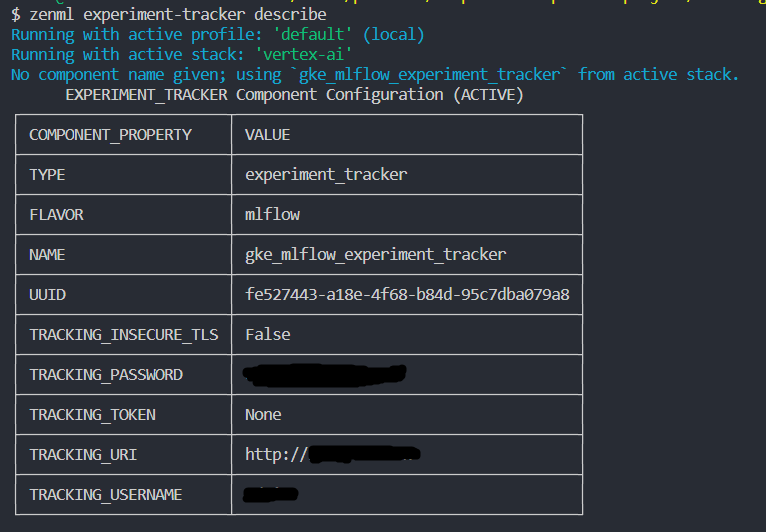
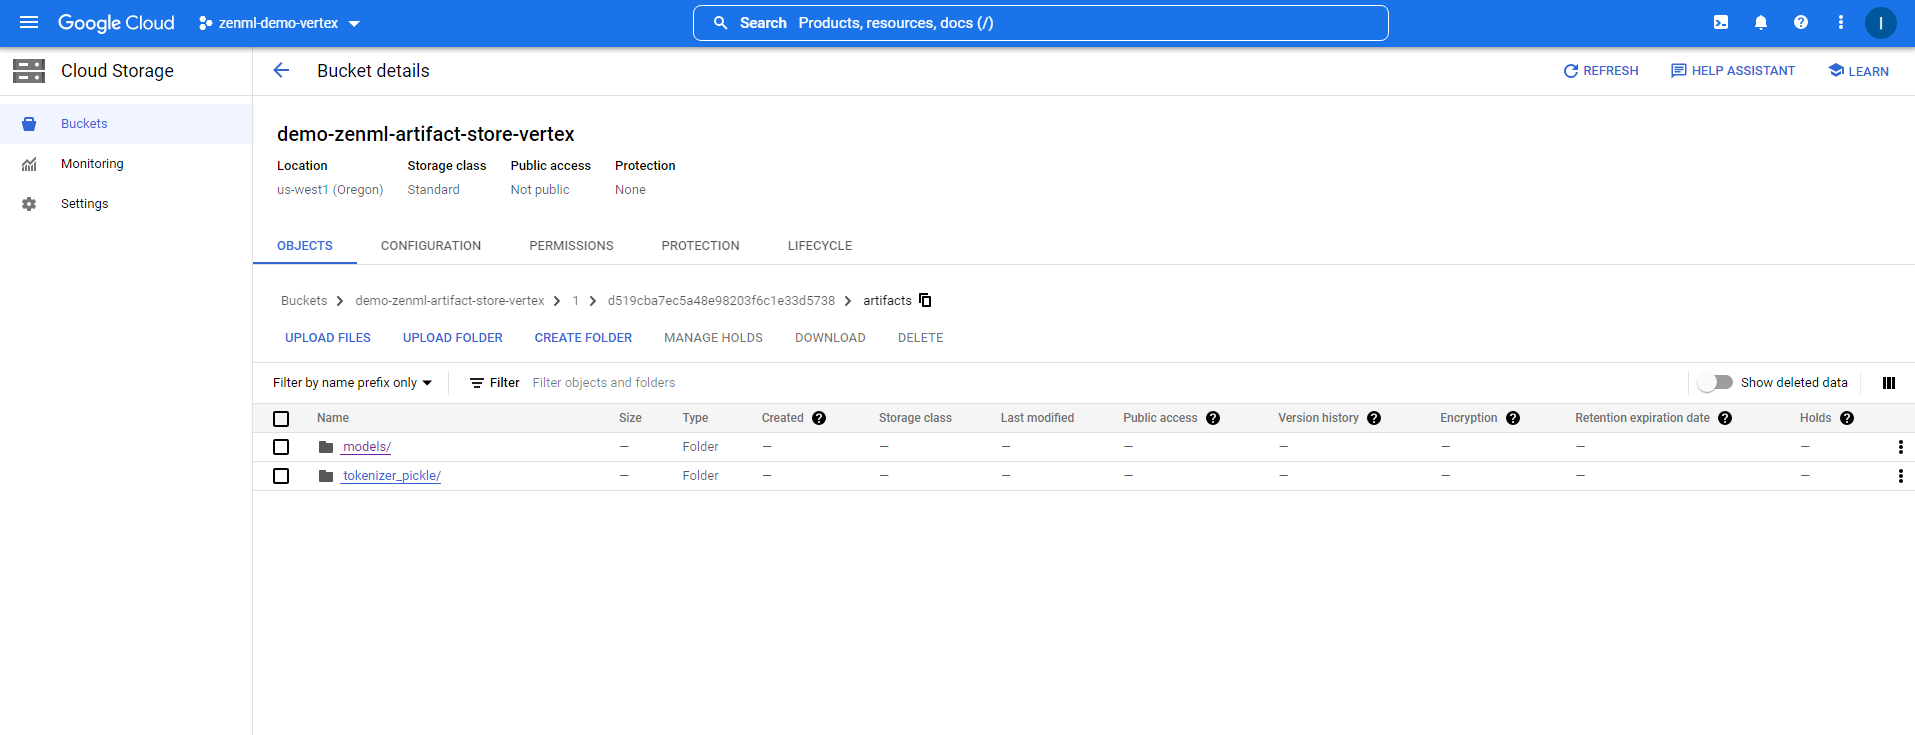
You can follow the TRACKING_URI and TRACKING_USERNAME and TRACKING_PASSWORD to access the MLflow UI. you can also check the Cloud Storage to see the MLflow artifacts:
Finally, if you want to run this pipeline on vertex-ai stack periodically and based on a schedule, you can containerize the code and deploy it as a Cloud Run microservice and then use Google Cloud Scheduler to trigger it. Something like the following architecture:
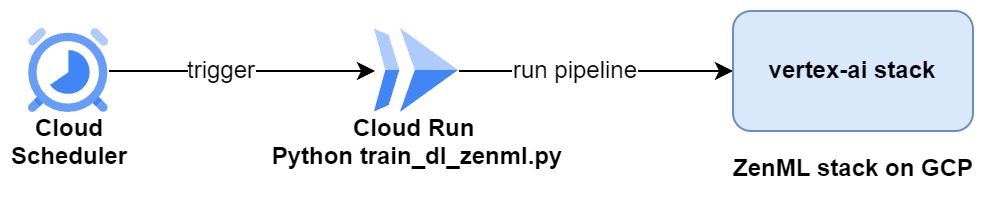
The scheduler will trigger the cloud run service to start running the pipeline on the vertex-ai stack on the GCP-provisioned infrastructure.
That's it for this post. I may update this post if ZenML adds some interesting features. As the final thought, I must admit that I loved ZenML. It's much more than defining a machine learning pipeline and helps you integrate different MLOps tools in your stack. It makes all the steps and MLOps tools easy to use. I decided to continue using it in this project and also in SUPPLYZ.eu stack.
In the next blog post, we will go for deploying the trained model. See you there.
Here are some resources I used: