MLOps project - part 3: Machine Learning Model Deployment
Deploying machine learning models in production.


So far in this series of blog posts, we saw how to do experiment tracking and creating a machine learning pipeline for model training. But what should we do now with the trained mode?! That's right. We have to deploy the model into production. so people can use it and make inference.
In this blog post we will see what is machine learning model deployment and what are the options that can help us to do it. In the next post, we will deploy our own trained model for customer sentiment analysis in production.
Let's get started.
Machine Learning Model Deployment
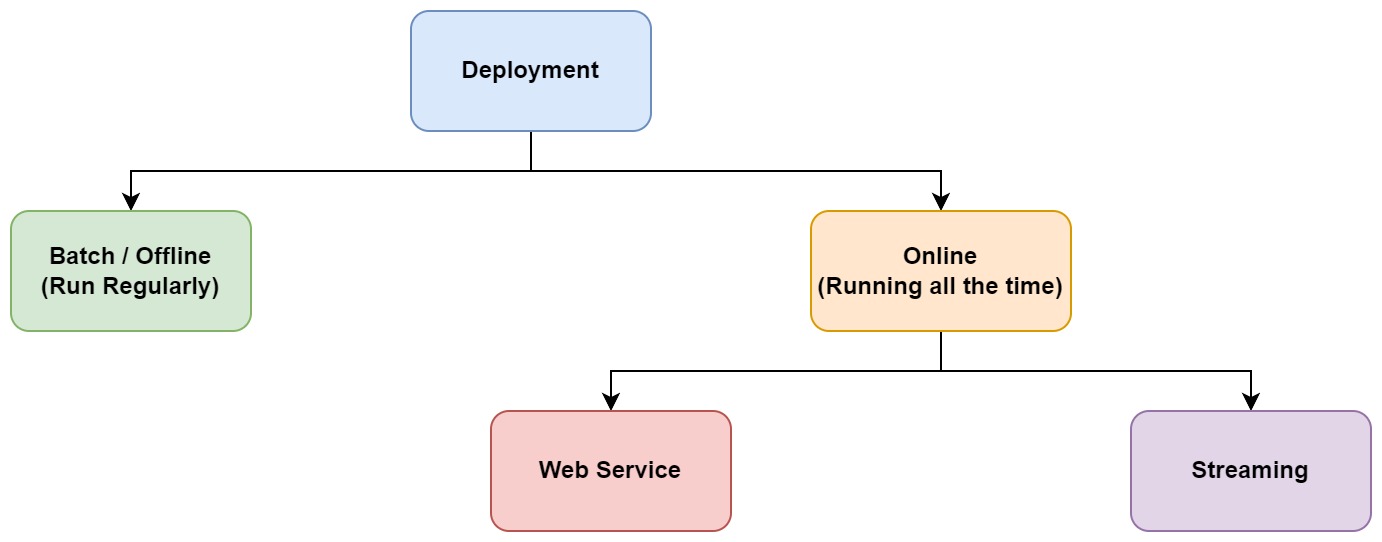
There are multiple options for model deployment. First, we need to ask if we want the predictions to be done immediately or if they can wait for an hour, a day, etc.
- In case we can wait a bit, we can go for batch or offline deployment. In this case, the model doen't need to be running all the time and we can call it with a batch of data regularly in a time interval.
- In the other case, we need the model predictions as soon as possible and the model should be running all the time. This is called online deployment. Online deployment has multiple variants as well:
- Web service: In this case, we deploy our model as a web service and we can send HTTPS requests and get the prediction from that.
- Streaming: In this case, there is a stream of events and model is listening to events and reacting to them.
Batch or Offline Mode
In this case, we need to apply the model to a batch of data in a time interval. It can be every 10 minutes, every half an hour, every day, every week, etc.
Usually we have a database with data in it and a job which has the model to pull the data from database and apply the model to the data. It can then save the results of the prediction into another database, so other jobs can use the data for other purposes like a report or dashboard.

Online Deployment
Web Service
The other common way of deploying models is Web Service which is in the category of Online deployment. In this case you have a web service which has the machine learning model. This service needs to be up and running all the time. It is also possible to use serverless microservices like a service deployed using Cloud Run. There would be a very small delay which needs to be taken into consideration and if it is not acceptable, you need to go for more real-time architectures. This case is more like a one-to-one relationship between client and server.

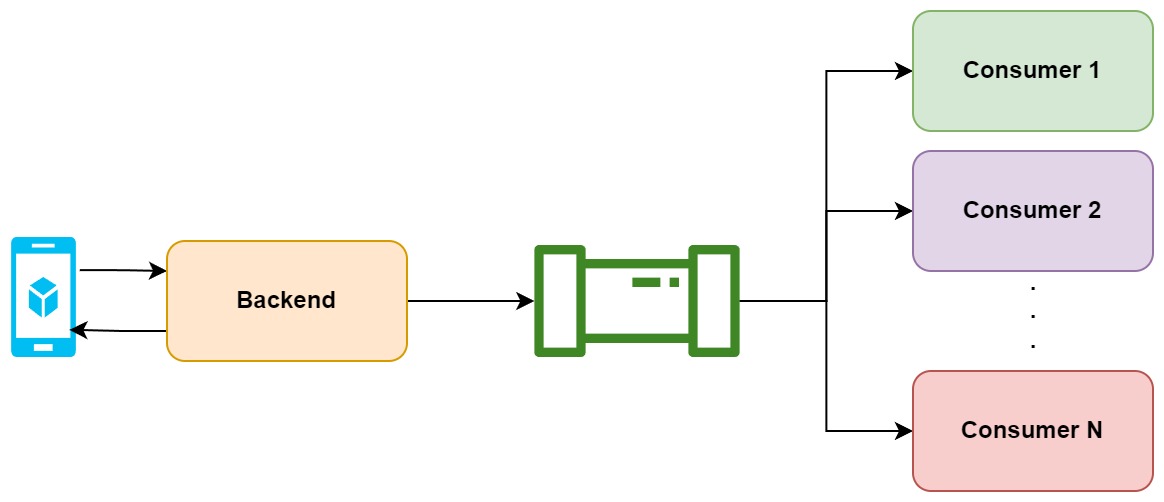
Streaming
In this case, we have producers and consumers. Producers will push some events into an event stream and multiple services or consumers would read from the stream and react to the events. This more like a one-to-many or many-to-many relationship between producer(s) and consumers. For example, the producer can be a user with an app which interacts with the backend and produces some events. Then this events will go to an stream event and multiple services can do different jobs on those events. The difference with the web service option is that there is no explicit connection between the procuser and consumers here. The producer just pushes an event and some services will process it. The result of these consumers may go to another event stream to be used by some other consumers and services. There is no limit there.
Check the following video to learn more about different deployment options:
In this blog post, we will deploy our app as a web server. To do this, we will use three approaches: Cloud Run, Vertex AI, and an open source MLOps tool.
Model Deployment Tools
There are many ways to deploy your model into production. This blog post does a nice comparison of three popular tools: Seldon Core, KServe, and BentoML.
The comparison is focused on 9 main areas of model serving tools:
- ability to serve models from standard frameworks, including Scikit-Learn, PyTorch, Tensorflow and XGBoost
- ability to serve custom models / models from niche frameworks
- ability to pre-process/post-process data
- impact on the development workflow and existing codebase
- availability of the documentation
- DevOps operability
- autoscaling capabilities
- available interfaces for obtaining predictions
- infrastructure management
KServe:KServe (previously, before the 0.7 version was named KFServing) is an open-source, Kubernetes-based tool providing custom abstraction (Kubernetes Custom Resource Definition) to define Machine Learning model serving capabilities. It’s main focus is to hide the underlying complexity of such deployments so that it’s users only need to focus on the ML-related parts. It supports many advanced features such as autoscaling, scaling-to-zero, canary deployments, automatic request batching as well as many popular ML frameworks out-of-the-box.> Seldon Core:Seldon Core is an open source tool developed by Seldon Technologies Ltd, as a building block of the larger (paid) Seldon Deploy solution. It’s similar to KServe in terms of the approach - it provides high level Kubernetes CRD and supports canary deployments, A/B testing as well as Multi-Armed-Bandit deployments. > BentoML:BentoML is a Python framework for wrapping the machine learning models into deployable services. It provides a simple object-oriented interface for packaging ML models and creating HTTP(s) services for them. BentoML offers in-depth integration with popular ML frameworks, so that all of the complexity related to packaging the models and their dependencies is hidden. BentoML-packaged models can be deployed in many runtimes, which include plain Kubernetes Clusters, Seldon Core, KServe, Knative as well as cloud-managed, serverless solutions like AWS Lambda, Azure Functions or Google Cloud Run. It's really informative and I highly recommend check it out.
From the above tools, I will use KServe in a ZenML stack to deploy our model. But first, let's see how to deploy the model as an endpoint using Cloud Run and Vertex AI.
In the previous posts, we trained the model on Vertex AI on GCP and used MLflow for experiment tracking. MLflow will save model artifacts on GCS. Here we just use those artifacts in our endpoint for prediction. I use a solution here to download the model based on experiment ID and run ID and pass these values as environment variable in the docker file. If you use Cloud Run for deployment, you can also set these variables using cloud commands. Check here for more information.
We develop a single endpoint for prediction using FastAPI. To access GCS, one way is to use service account. You can create the service account from Google Console and give it the required access to storage. I give it storage admin role here, but in production, you can give more limited access. Then you need to generate the JSON key file and same it with the name of key.json it in the root folder. Be carefull to add this file to your .gitignore file as you don't want to push it into Github.
Here is the code:
from fastapi import FastAPI
import os
import nltk
from nltk.corpus import stopwords
from tensorflow.keras.preprocessing.sequence import pad_sequences
import mlflow
import pickle
from google.cloud import storage
from nltk.corpus import stopwords
from nltk.stem.porter import PorterStemmer

nltk.download('stopwords')
experiment_id = str(os.getenv("EXPERIMENT_ID"))
run_id = str(os.getenv("RUN_ID"))

path_on_gcs = experiment_id + "/" + run_id
stop_words = set(stopwords.words('english'))


# fastapi app
app = FastAPI(
    title="Fashion Sentment Analysis REST API",
    description="This API analyses the review for a fashion product.",
    version="0.0.1",
    contact={
        "name": "Isaac Kargar",
        "email": "Isaac@email.com",
    },
)


def preprocess(review):
    review_processed = review.lower()
    review_processed = review_processed.split()
    ps = PorterStemmer()
    review_processed =[ps.stem(i) for i in review_processed if not i in set(stopwords.words('english'))]
    review_processed =' '.join(review_processed)
    return review_processed

def download_mlflow_artifacts():
    # create storage client
    storage_client = storage.Client.from_service_account_json('key.json')
    # storage_client = storage.Client()
    # get bucket with name
    bucket = storage_client.get_bucket('mlflow')
    # get bucket data as blob
    blobs = bucket.list_blobs(prefix=path_on_gcs)

    for blob in blobs:
        blob_name = blob.name
        file_path = "models/" + blob_name
        folder_path = os.path.dirname(file_path)
        if os.path.isdir(folder_path) == False:
            os.makedirs(folder_path)

        blob.download_to_filename(file_path)

    print("Artifacts downloaded.\n\n")

def load_model_tokenizer():
    artifact_folder = f"models/{path_on_gcs}/artifacts"
    model = mlflow.pyfunc.load_model(f"{artifact_folder}/models/model_dl")

    with open(f"{artifact_folder}/tokenizer_pickle/tf_tokenizer.pickle", 'rb') as handle:
        tokenizer = pickle.load(handle)

    print("Model and tokenizer loaded.\n\n")
    return model, tokenizer


@app.get("/")
async def root():
    return {"message": "Customer review sentiment analysis"}


@app.get("/predict")
async def get_predict(review: str,):
    """
    Reads the list of sensors from the database
    """
    try:
        review_processed = preprocess(review)

        if len(review_processed) == 0:
            return {"message": "Please enter a valid review - It seems there is no valubale review in the text."}

        download_mlflow_artifacts()
        model, tokenizer = load_model_tokenizer()
        review_processed = tokenizer.texts_to_sequences(review_processed)
        review_processed = pad_sequences(review_processed, padding='post').T
        prediction = model.predict(review_processed)
        return {
            "prediction": str(prediction[0][0])
            }

    except Exception as e:
        return {"error": str(e)}

if __name__ == "__main__":
    import uvicorn

    uvicorn.run(app, host="0.0.0.0", port=8000)
We then need to create a Dockerfile. I use pipenv in this project to be able to have isolated virtual environment for each project. You can learn more about it here. Our Dockerfile would be as follows:
FROM python:3.9-slim

RUN pip install -U pip
RUN pip install pipenv

EXPOSE 8080
ENV EXPERIMENT_ID <mlflow experiment id>
ENV RUN_ID <mlflow run id>

WORKDIR /app

COPY . .

RUN pipenv install --system --deploy

CMD ["uvicorn", "main:app", "--host", "0.0.0.0", "--port", "8080"]
We use uvicorn web server for FastAPI here. You can also see that I set EXPERIMENT_ID and RUN_ID as environment variables to be used in my python code.
Then we can build the image and test locally first. Follow the steps below to do so:
-
Build the image
docker build -t sentiment:v1 .
-
Run the econtainer
docker run -it --rm -p 8080:8080 sentiment:v1 -
Then visit http://localhost:8080/docs to view your fastapi app. You will see the following page which you can play with the API interactively:
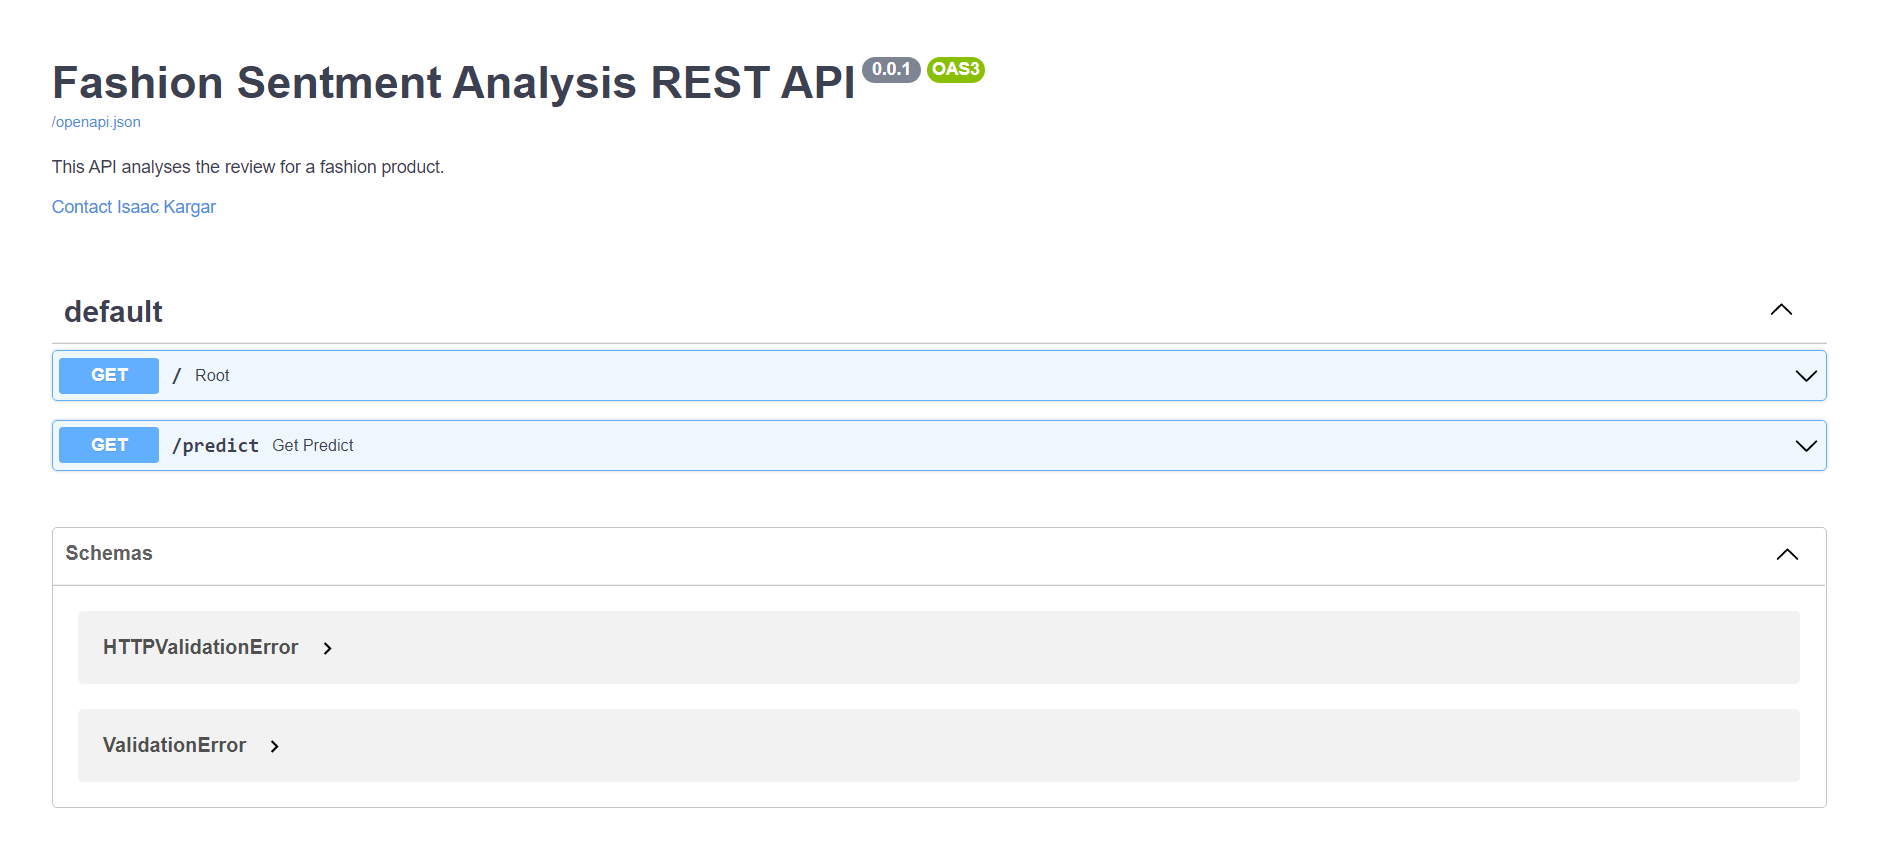
- You can then interact with it and test:

If everything works fine, you can deploy the app on Google Cloud using the following commands:
- Set project ID variable:
export PROJECT_ID=<your gcp project id>
-
Build the image:
gcloud builds submit --tag gcr.io/$PROJECT_ID/sentiment -
Deploy on cloud run:
gcloud run deploy sentiment --image gcr.io/$PROJECT_ID/sentiment --platform managed --allow-unauthenticated
You then should be able to use the endpoint link and see the same page as before.
We also developed a simple UI using streamlit package to get user review about a product and analyze it. The code for UI is as follows:
import streamlit as st
import requests

st.set_page_config(
    page_title="Fashion Sentiment Analysis",
    page_icon="📈",
    layout="wide"
)

st.header("Fashion Sentiment Analysis UI")

st.image("https://krm-stc-ms.azureedge.net/-/media/Images/Ecco/Products/MENS/BROWN/ECCO-SOFT-7-M/470364-02053-main.webp?Crop=1&Size=ProductDetailsMedium1x")

review_text = st.text_input('User review about the product:', 'Input your review here')

if st.button("Analyze"):
    endpoint = "<url for the deployed model on cloud run>"
    url = f'{endpoint}/predict?review={review_text}'

    prediction = requests.get(url).json()
    st.write("Prediction:", prediction)
And the Docker file would be as follows:
FROM python:3.9-slim

RUN pip install -U pip
RUN pip install pipenv

EXPOSE 8080

WORKDIR /app

COPY . .

RUN pipenv install --system --deploy

CMD streamlit run --server.port 8080 --server.enableCORS=false app.py
You can again dockerize this and deploy it on Cloud Run as another microservice by following the steps below:
-
Set project ID variable:
export PROJECT_ID=$(gcloud config get-value core/project)
-
build the image:
gcloud builds submit --tag gcr.io/$PROJECT_ID/sentiment_ui -
deploy on cloud run:
gcloud run deploy sentimentui --image gcr.io/$PROJECT_ID/sentiment_ui --platform managed --allow-unauthenticated
By following the url for the sentimentui endpoint, you would see a UI wo as follows:
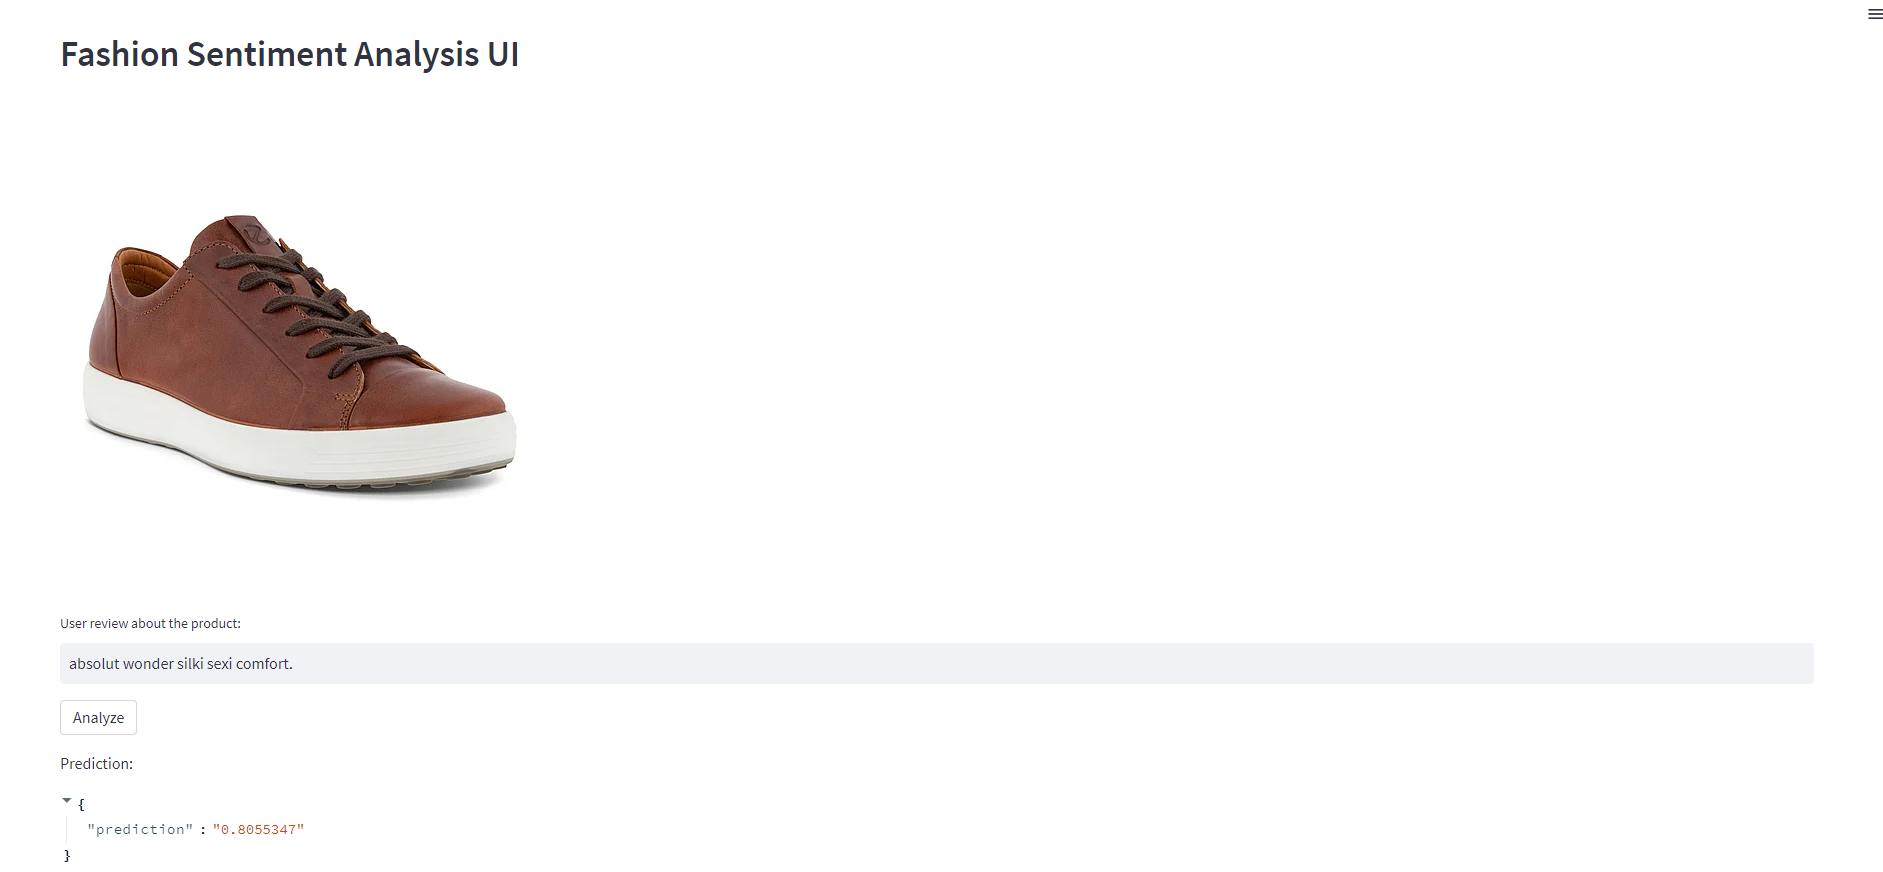
Great. We deployed our model as an endpoint and developed a simple UI for people to write their comment on the product, and we then call the endpoint and make the inference.
But, what if the model needs GPU for inference? For those models, we can go for Vertex AI. We can also use Vertex AI for models with CPU, but there are some points that we need to be aware of. The absence of a downscale to zero is one of the main drawbacks of Vertex AI Endpoints. There is always at least one endpoint node active. It can cost more than 100$ per month for a single endpoint . Even if you receive no requests for predictions, you still have to pay the fee. It is absurd. This is acceptable if you just have one model deployed, but it adds up over time as you deploy more and more models. Additionally, keep in mind that prices increase with machine size. Consider deploying your model to Cloud Run rather than Vertex AI Endpoints if your model does not require the use of a GPU. Cloud Run is capable of scaling down to zero. On the other hand, keep in mind that if you use Cloud Run instead of Vertex AI, you lose some of the capabilities like Explainable AI or Model Monitoring. Check this blog post for more detailed comparison.
Anyway, let's see how we can use Vertex AI to deploy our model as an endpoint. You can decide in each project if you want to use it or not.
Deploying a model as an endpoint on Vertex is really easy. You can check this blog post to learn how to do it using Google Cloud Console. I use gcloud here to do the same. Follow the steps below:
- Import model to Vertex AI model registry:
gcloud ai models upload \
  --region=europe-west1 \
  --display-name=sentiment2 \
  --container-image-uri=gcr.io/$PROJECT_ID/sentiment_ui
- Create an endpoint:
gcloud ai endpoints create \
  --region=europe-west1 \
  --display-name=sentiment2
- Get the ID for model and endpoint:
gcloud ai endpoints list --region=europe-west1
gcloud ai models list --region=europe-west1
- Deploy the model to the endpoint using the above IDs:
gcloud ai endpoints deploy-model <ENDPOINT_ID> \
  --region=europe-west1 \
  --model=<MODEL_ID> \
  --display-name=sentiment2

gcloud ai endpoints deploy-model 3509588339302858752 \
  --region=europe-west1 \
  --model=4628381002983538688 \
  --display-name=sentiment2
You can use the --accelerator flag if you want to use GPU. Check here to learn more.
KServe with ZenML
KServe provides a Kubernetes Custom Resource Definition for serving machine learning (ML) models on arbitrary frameworks. It aims to solve production model serving use cases by providing performant, high abstraction interfaces for common ML frameworks like Tensorflow, XGBoost, ScikitLearn, PyTorch, and ONNX. It encapsulates the complexity of autoscaling, networking, health checking, and server configuration to bring cutting edge serving features like GPU Autoscaling, Scale to Zero, and Canary Rollouts to your ML deployments. It enables a simple, pluggable, and complete story for Production ML Serving including prediction, pre-processing, post-processing and explainability. KServe is being used across various organizations.
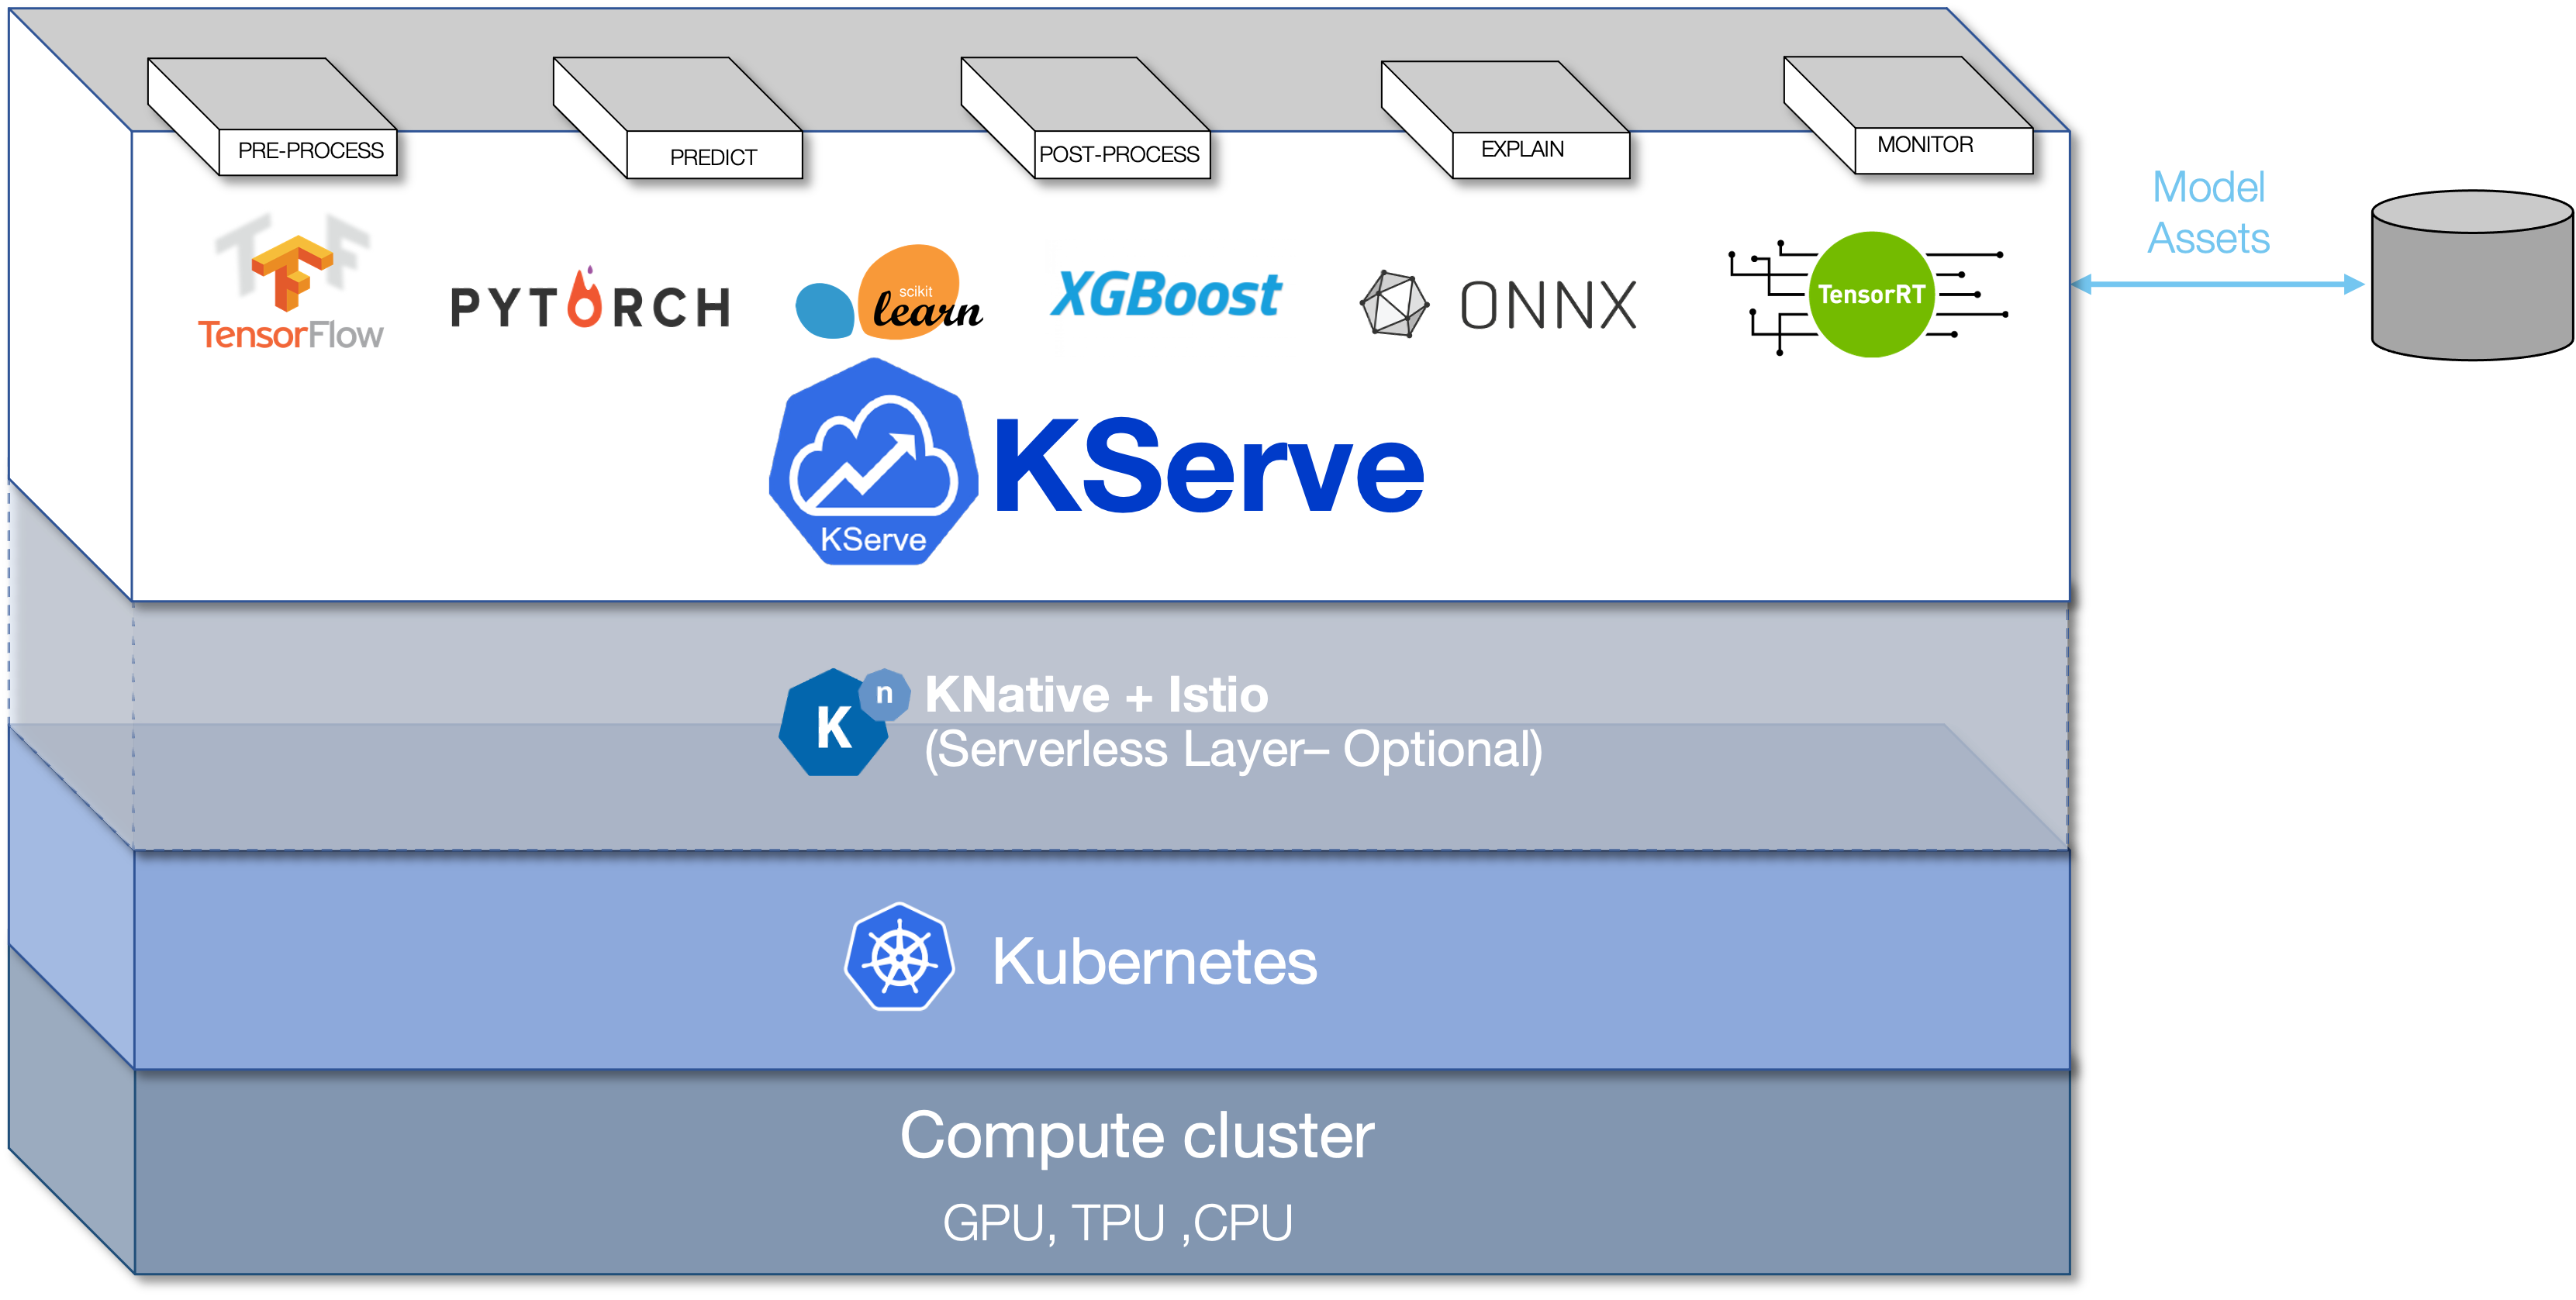
https://blog.zenml.io/deploy-with-kserve/