MLOps project- part 1: Machine Learning Experiment Tracking Using MLflow
Experiment tracking in machine learning model development.


In this series of blog posts, I will describe the entire procedure for developing a machine learning service, from development to deployment to monitoring. This is the final project for the phenomenal MLOps zoomcamp course.
This series aims to train a simple sentiment analysis model, deploy it to Google Cloud (Cloud Run) as a serverless microservice, build a simple UI using Streamlit, and utilize MLOps tools like MLflow, Prefect&ZenML, and EvidentlyAI&Seldon ALIBI Detect for experiment tracking, workflow orchestration, and model monitoring.
The program receives an E-commerce clothing review and forecasts if the customer would recommend the product to her friends. You can find the dataset here.
We do not focus that much on the model development here. I use Kaggle notebook as the reference and will try to do experiment tracking using MLflow. You can check the main notebook for further data preprocessing and visualizations.
So, what is experiment tracking? Experiment tracking is the process of keeping track of all the relevant information from an ML experiment, which includes:
- source code
- environment
- data
- model
- hyperparameters
- metrics
- ...
And why is experiment tracking important?
- reproducibility
- organization
- optimization
MLflow is an open source platform for managing the end-to-end machine learning lifecycle, and we will use it here. It tackles four primary functions:[source]
-
Tracking experiments to record and compare parameters and results (MLflow Tracking). The MLflow Tracking component is an API and UI for logging parameters, code versions, metrics, and output files when running your machine learning code and for later visualizing the results
-
Packaging ML code in a reusable, reproducible form in order to share with other data scientists or transfer to production (MLflow Projects).
-
Managing and deploying models from a variety of ML libraries to a variety of model serving and inference platforms (MLflow Models).
-
Providing a central model store to collaboratively manage the full lifecycle of an MLflow Model, including model versioning, stage transitions, and annotations (MLflow Model Registry).
You can learn more about MLflow by reading their documentations and also watching the videos from the MLOps zoomcamp course.
In this post, we train three different ML models for the sentiment analysis task: Bag of Words, TF-IDF, and a simple neural network model.
First you need to install MLflow using pip. You can check more here.
You can then run the MLflow UI using:
mlflow ui --backend-store-uri sqlite:///mlflow.db
You can then see the UI at this address: http://127.0.0.1:5000/
It is also possible to run MLflow on Cloud to store models and metadata there. I wrote a blog post about how to set up MLflow on GCP. You can read it here.
For hyperparameter optimization you can use hyperopt library. Currently, three algorithms are implemented in hyperopt:
- Random Search
- Tree of Parzen Estimators (TPE)
- Adaptive TPE
Hyperopt has been designed to accommodate Bayesian optimization algorithms based on Gaussian processes and regression trees, but these are not currently implemented.
We don't have that many parameters here, so we don't use hyperopt, but you can check it out.
Let's start with the BoW model:
import numpy as np
import pandas as pd
import os
import re
os.environ["NLTK_DATA"] = "./corpora"
from nltk.corpus import stopwords
from nltk.stem.porter import PorterStemmer
from sklearn.model_selection import train_test_split
from sklearn.feature_extraction.text import CountVectorizer as CV
from sklearn.naive_bayes import BernoulliNB
from sklearn.metrics import accuracy_score
import pickle
import mlflow

mlflow.set_tracking_uri("sqlite:///mlflow.db")
mlflow.set_experiment("customer-sentiment-analysis")

## data loading
data = pd.read_csv('Womens Clothing E-Commerce Reviews.csv',index_col =[0])

## preprocess text
data = data[~data['Review Text'].isnull()]  #Dropping columns which don't have any review
X = data[['Review Text']]
X.index = np.arange(len(X))

y = data['Recommended IND']

corpus =[]
for i in range(len(X)):
    review = re.sub('[^a-zA-z]',' ',X['Review Text'][i])
    review = review.lower()
    review = review.split()
    ps = PorterStemmer()
    review =[ps.stem(i) for i in review if not i in set(stopwords.words('english'))]
    review =' '.join(review)
    corpus.append(review)

cv  = CV(max_features = 3000,ngram_range=(1,1))
X_cv = cv.fit_transform(corpus).toarray()
y = y.values

X_train, X_test, y_train, y_test = train_test_split(X_cv, y, test_size = 0.20, random_state = 0)

mlflow.sklearn.autolog()

with mlflow.start_run():

    mlflow.set_tag("developer", "Isaac")
    mlflow.set_tag("algorithm", "BernoulliNB")
    mlflow.log_param("train-data", "Womens Clothing E-Commerce Reviews")

    alpha = 1
    mlflow.log_param("alpha", alpha)

    classifier = BernoulliNB(alpha = alpha)
    classifier.fit(X_train, y_train)

    y_pred = classifier.predict(X_test)
    acc = accuracy_score(y_test, y_pred)

    mlflow.log_metric("accuracy", acc)

    print("accuracy on test data:", acc)

    model_name = "model_bow.bin"
    with open("models/" + model_name, 'wb') as fout:
        pickle.dump((cv, classifier), fout)

    mlflow.log_artifact(local_path="models/" + model_name, artifact_path="models_pickle")
You can see how easy it is to use MLflow to keep track of the ML model development process.
Let's do it for TF-IDF too:
import numpy as np
import pandas as pd
import os

import nltk
import re
# nltk.download('stopwords')
os.environ["NLTK_DATA"] = "./corpora"

from nltk.corpus import stopwords
from nltk.stem.porter import PorterStemmer
from sklearn.model_selection import train_test_split
from sklearn.naive_bayes import MultinomialNB
from sklearn.metrics import accuracy_score
from sklearn.feature_extraction.text import TfidfVectorizer as TV
import pickle
import mlflow

mlflow.set_tracking_uri("sqlite:///mlflow.db")
mlflow.set_experiment("customer-sentiment-analysis")

## data loading
data = pd.read_csv('Womens Clothing E-Commerce Reviews.csv',index_col =[0])

## preprocess text
data = data[~data['Review Text'].isnull()]  #Dropping columns which don't have any review
X = data[['Review Text']]
X.index = np.arange(len(X))

y = data['Recommended IND']

corpus =[]
for i in range(len(X)):
    review = re.sub('[^a-zA-z]',' ',X['Review Text'][i])
    review = review.lower()
    review = review.split()
    ps = PorterStemmer()
    review =[ps.stem(i) for i in review if not i in set(stopwords.words('english'))]
    review =' '.join(review)
    corpus.append(review)

tv  = TV(ngram_range =(1,1),max_features = 3000)
X_tv = tv.fit_transform(corpus).toarray()

X_train, X_test, y_train, y_test = train_test_split(X_tv, y, test_size = 0.20, random_state = 0)

mlflow.sklearn.autolog()

with mlflow.start_run():

    mlflow.set_tag("developer", "Isaac")
    mlflow.set_tag("algorithm", "MultinomialNB")
    mlflow.log_param("train-data", "Womens Clothing E-Commerce Reviews")

    alpha = 1
    mlflow.log_param("alpha", alpha)

    classifier = MultinomialNB(alpha = alpha)
    classifier.fit(X_train, y_train)

    y_pred = classifier.predict(X_test)
    acc = accuracy_score(y_test, y_pred)

    mlflow.log_metric("accuracy", acc)

    print("accuracy on test data:", acc)

    model_name = "model_tfidf.bin"
    with open("models/" + model_name, 'wb') as fout:
        pickle.dump((tv, classifier), fout)

    mlflow.log_artifact(local_path="models/" + model_name, artifact_path="models_pickle")
And finally, the deep learning model:
import numpy as np
import pandas as pd
import os

import nltk
import re
# nltk.download('stopwords')
os.environ["NLTK_DATA"] = "./corpora"

from nltk.corpus import stopwords
from nltk.stem.porter import PorterStemmer

import tensorflow as tf
from tensorflow.keras.preprocessing.text import Tokenizer
from tensorflow.keras.preprocessing.sequence import pad_sequences
from sklearn.model_selection import train_test_split
import mlflow
import pickle

mlflow.set_tracking_uri("sqlite:///mlflow.db")
mlflow.set_experiment("customer-sentiment-analysis")

## data loading
data = pd.read_csv('Womens Clothing E-Commerce Reviews.csv',index_col =[0])

## preprocess text
data = data[~data['Review Text'].isnull()]  #Dropping columns which don't have any review
X = data[['Review Text']]
X.index = np.arange(len(X))

y = data['Recommended IND']

corpus =[]
for i in range(len(X)):
    review = re.sub('[^a-zA-z]',' ',X['Review Text'][i])
    review = review.lower()
    review = review.split()
    ps = PorterStemmer()
    review =[ps.stem(i) for i in review if not i in set(stopwords.words('english'))]
    review =' '.join(review)
    corpus.append(review)

## tokenization and dataset creation
tokenizer = Tokenizer(num_words = 3000)
tokenizer.fit_on_texts(corpus)

sequences = tokenizer.texts_to_sequences(corpus)
padded = pad_sequences(sequences, padding='post')

X_train, X_test, y_train, y_test = train_test_split(padded, y, test_size = 0.20, random_state = 0)

with mlflow.start_run():
    ## model definition
    embedding_dim = 32
    model = tf.keras.Sequential([
        tf.keras.layers.Embedding(3000, embedding_dim),
        tf.keras.layers.GlobalAveragePooling1D(),
        tf.keras.layers.Dense(6, activation='relu'),
        tf.keras.layers.Dense(1, activation='sigmoid')
    ])

    ## training
    num_epochs = 50
    batch_size = 32
    callback = tf.keras.callbacks.EarlyStopping(
        monitor="val_loss",
        min_delta=0,
        patience=2,
        verbose=0,
        mode="auto",
        baseline=None,
        restore_best_weights=False,
    )

    model.compile(loss='binary_crossentropy',optimizer='adam',metrics=['accuracy'])

    mlflow.set_tag("developer", "Isaac")
    mlflow.set_tag("algorithm", "Deep Learning")
    mlflow.log_param("train-data", "Womens Clothing E-Commerce Reviews")
    mlflow.log_param("embedding-dim", embedding_dim)

    print("Fit model on training data")
    history = model.fit(
        X_train,
        y_train,
        batch_size=batch_size,
        epochs=num_epochs,
        callbacks=callback,
        # We pass some validation for
        # monitoring validation loss and metrics
        # at the end of each epoch
        validation_data=(X_test, y_test),
    )

    ## save model and tokenizer
    mlflow.keras.log_model(model, 'models/model_dl')

    with open('models/tf_tokenizer.pickle', 'wb') as handle:
        pickle.dump(tokenizer, handle, protocol=pickle.HIGHEST_PROTOCOL)

    mlflow.log_artifact(local_path="models/tf_tokenizer.pickle", artifact_path="tokenizer_pickle")

    # Evaluate the model on the test data using `evaluate`
    print("Evaluate on test data")
    results = model.evaluate(X_test, y_test, batch_size=128)
    print("test loss, test acc:", results)
    mlflow.log_metric("loss", results[0])
    mlflow.log_metric("accuracy", results[1])
As you can see, we can use autolog() for TensorFlow and Scikit Learn to log parameters (automatically) or we can also log whatever we want manually. Finally, you will see something like below after training different models with different hyperparameters:
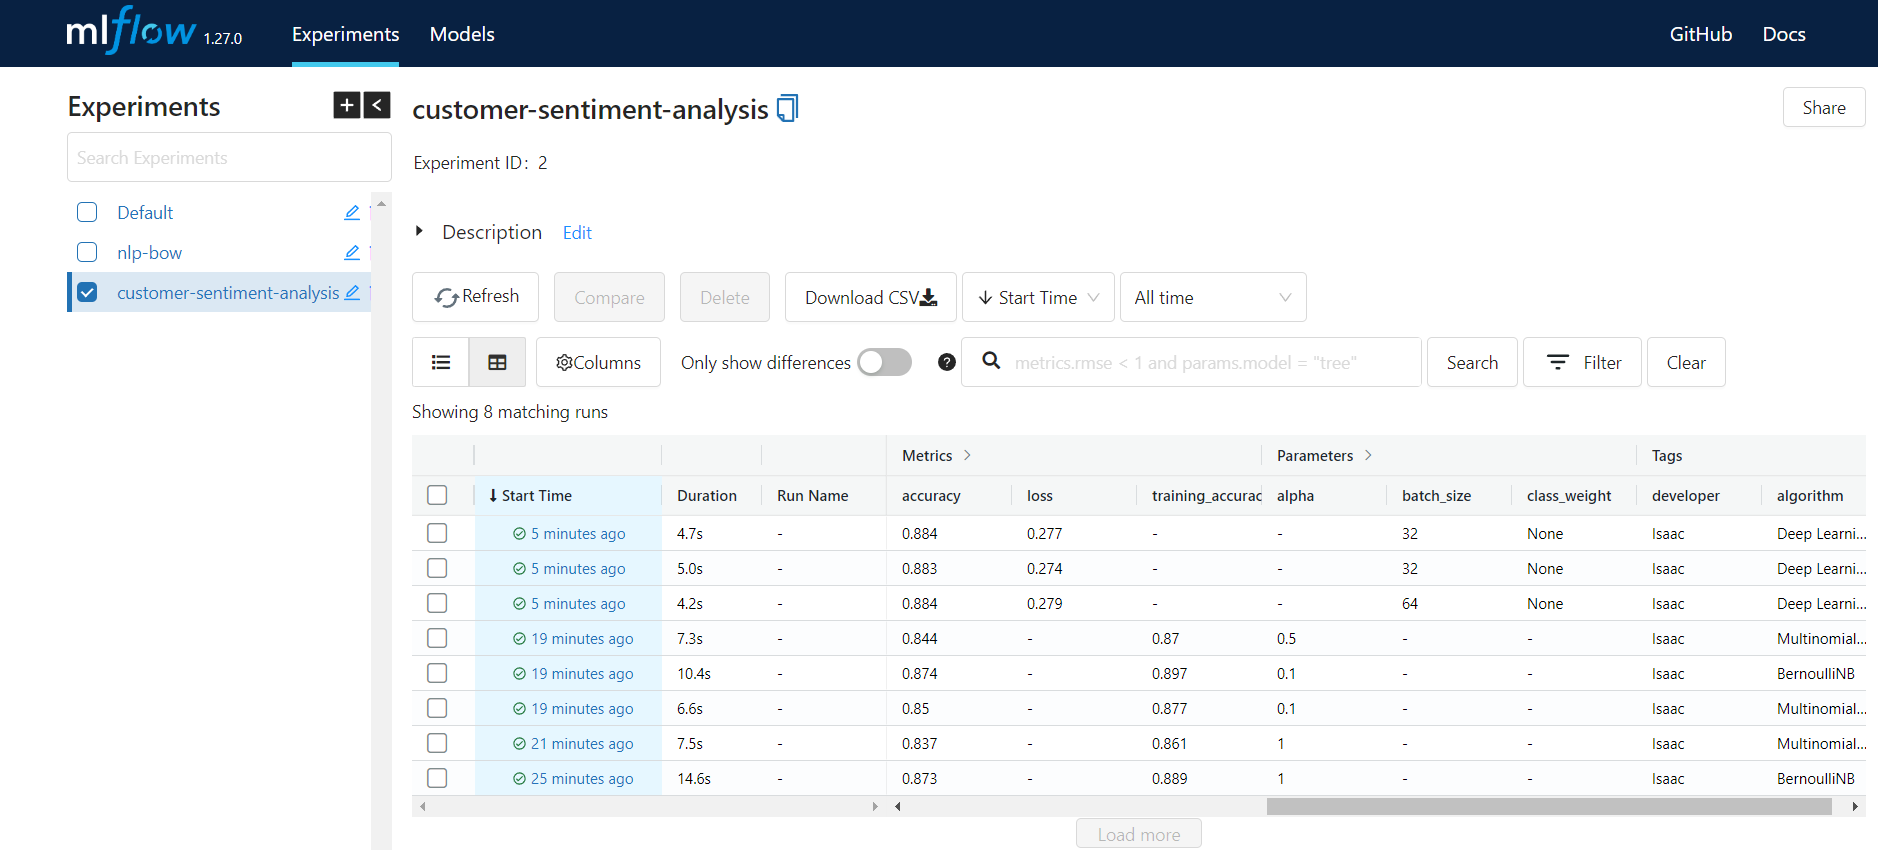
You can then easily go to each one of the experiments and see more details for each run and compare them. You can select one model based on different parameters like training time, accuracy, etc..
Note that we can log a model using one of the following two ways:
-
save the model based on the framework, and then use
mlflow.log_artifact(local_path=<local path to saved model>, artifact_path=<name of the folder you want the model to be saved in mlruns>). We saved the tokenizer using this method in the deep learning version above. -
second, you can use
mlflow.<framework>.log_model(...). We saved the Keras model using this method in the deep learning version above.
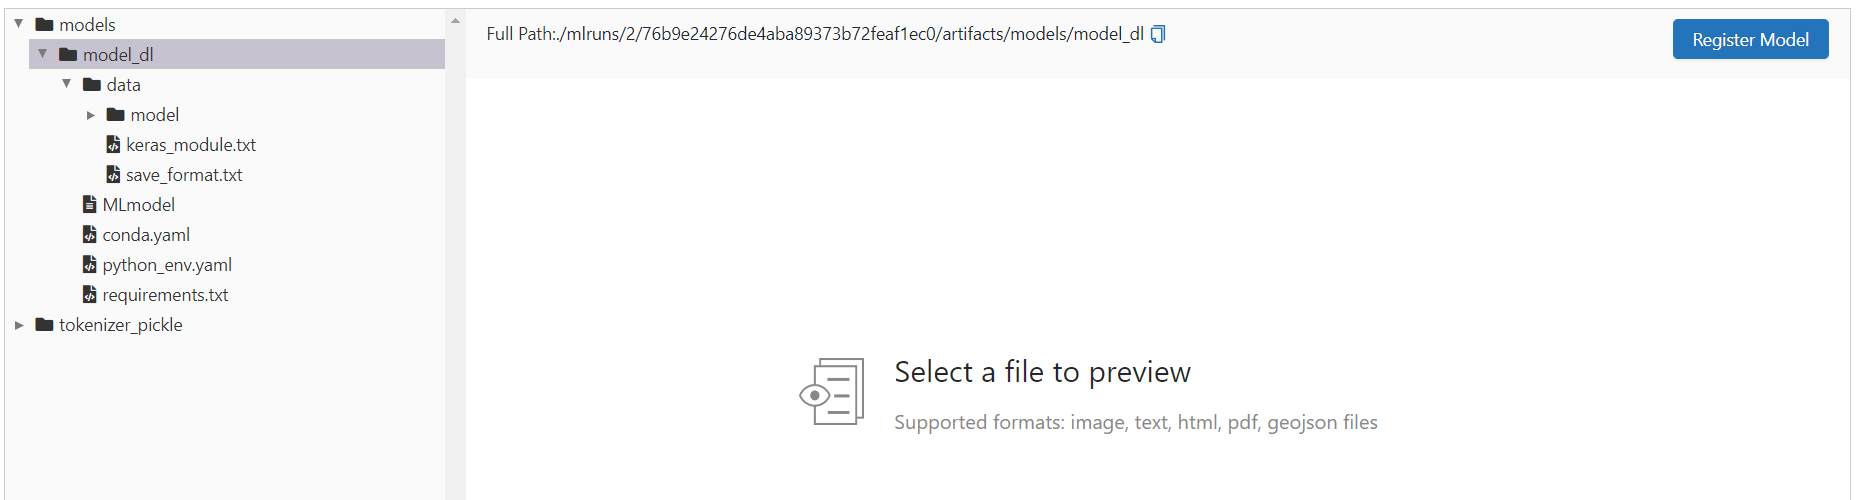
Let's take a look at what is saved for one of the runs. For example one of the deep learning runs:
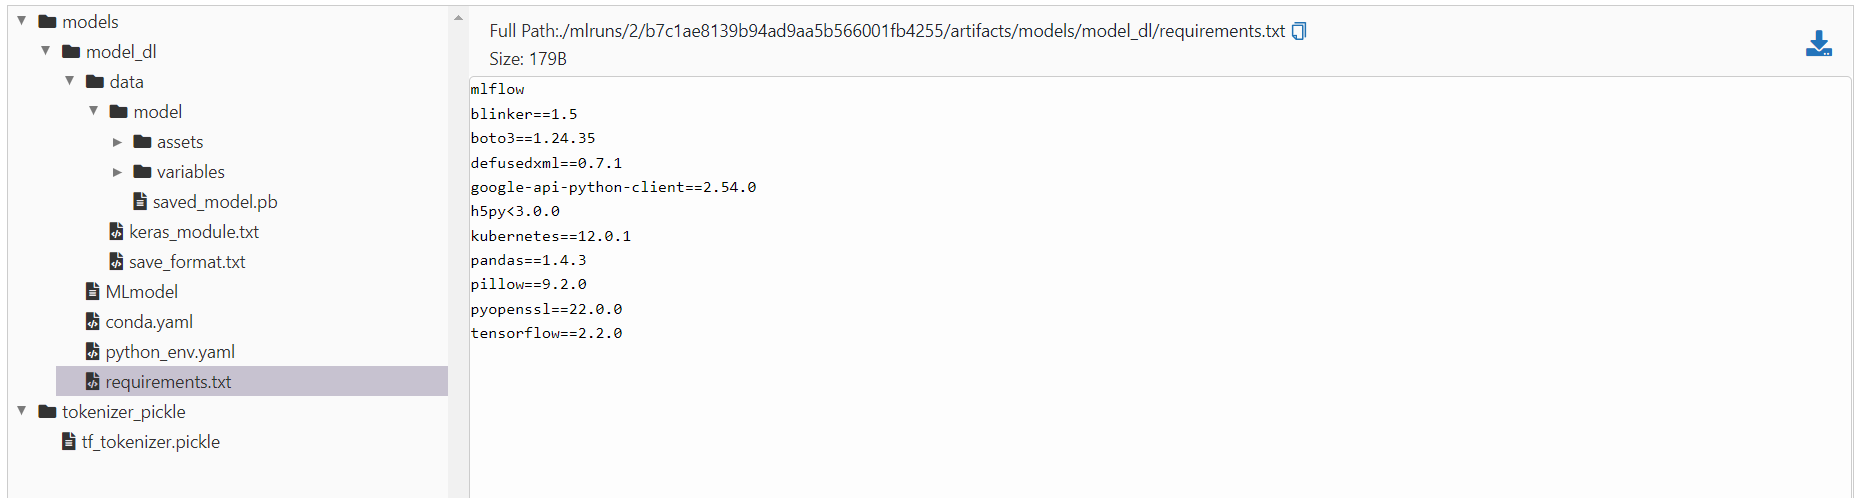
As you see, the model, tokenizer, all the information about the required python packages, and many more metadata are saved. Each run has a unique run id, which we will use it later.
Now let's go for the next stage called Model Management which is about how we can manage the trained models.
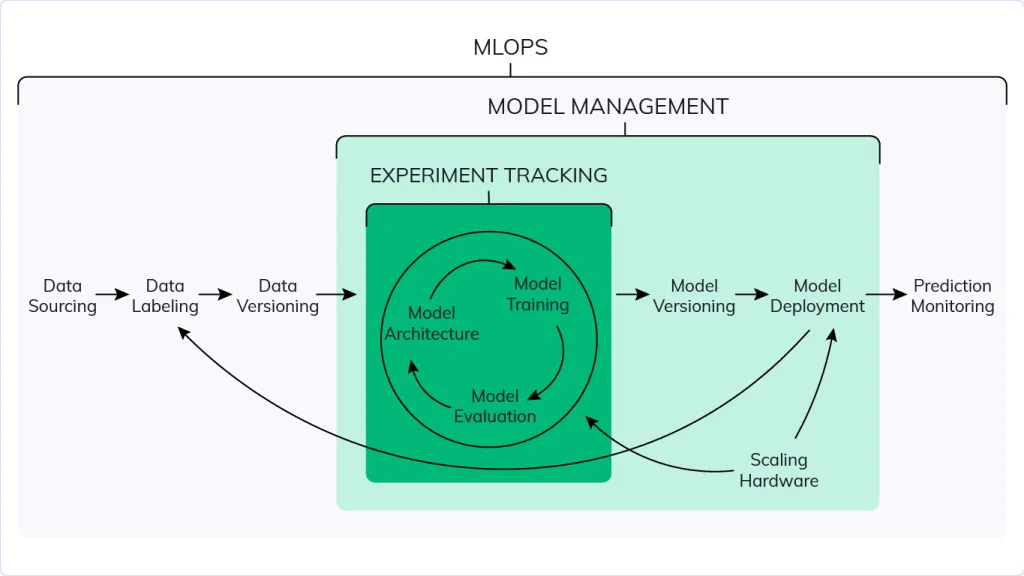
As you can see from the codes above, we save models for every run. Then, there should be model versioning followed by deployment. Let's see how MLflow can be used for model management.
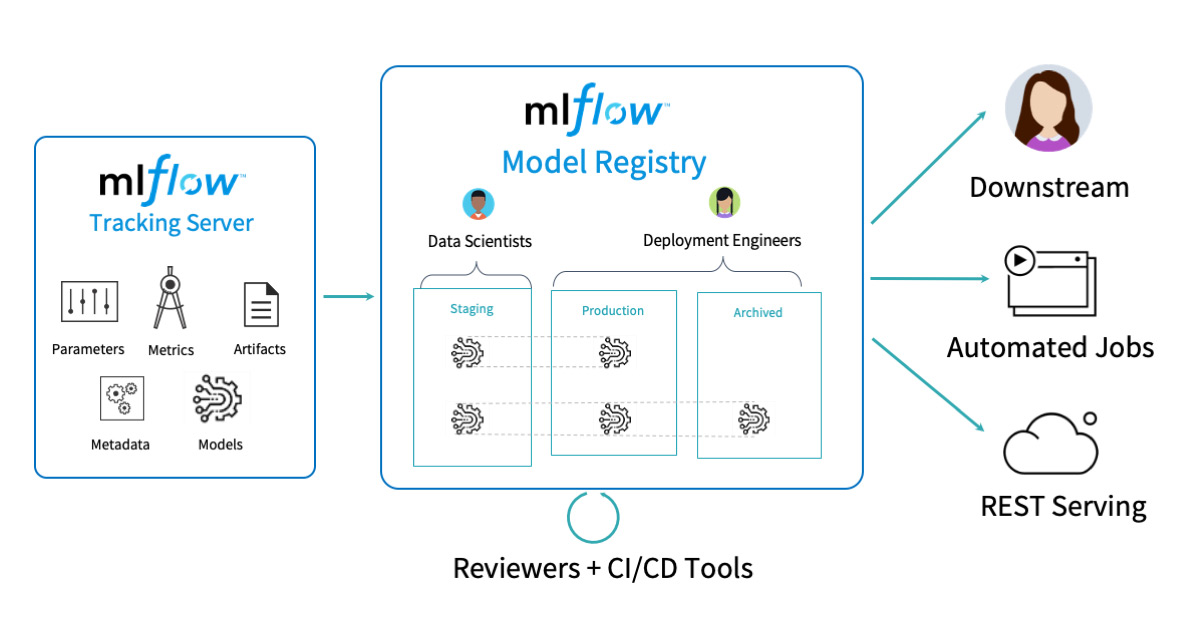
Following the previous step, we will have several model runs and trained models. The data scientist must then select a subset of these models based on a number of metrics and register them in the MLflow model registry. The model registry contains multiple stages/labels, including staging, production, and archive. The model will enter the staging area first. The MLflow Model Registry is a centralized model repository, APIs, and user interface for managing the whole lifecycle of an MLflow Model. It includes model lineage (which MLflow experiment and run created the model), model versioning, stage transitions (such as staging to production), and annotations [source].
The deployment engineer or team can then begin working on the models in the model registry and staging and decide, based on parameters such as the size of the model or the inference time, which model will go to the production stage.
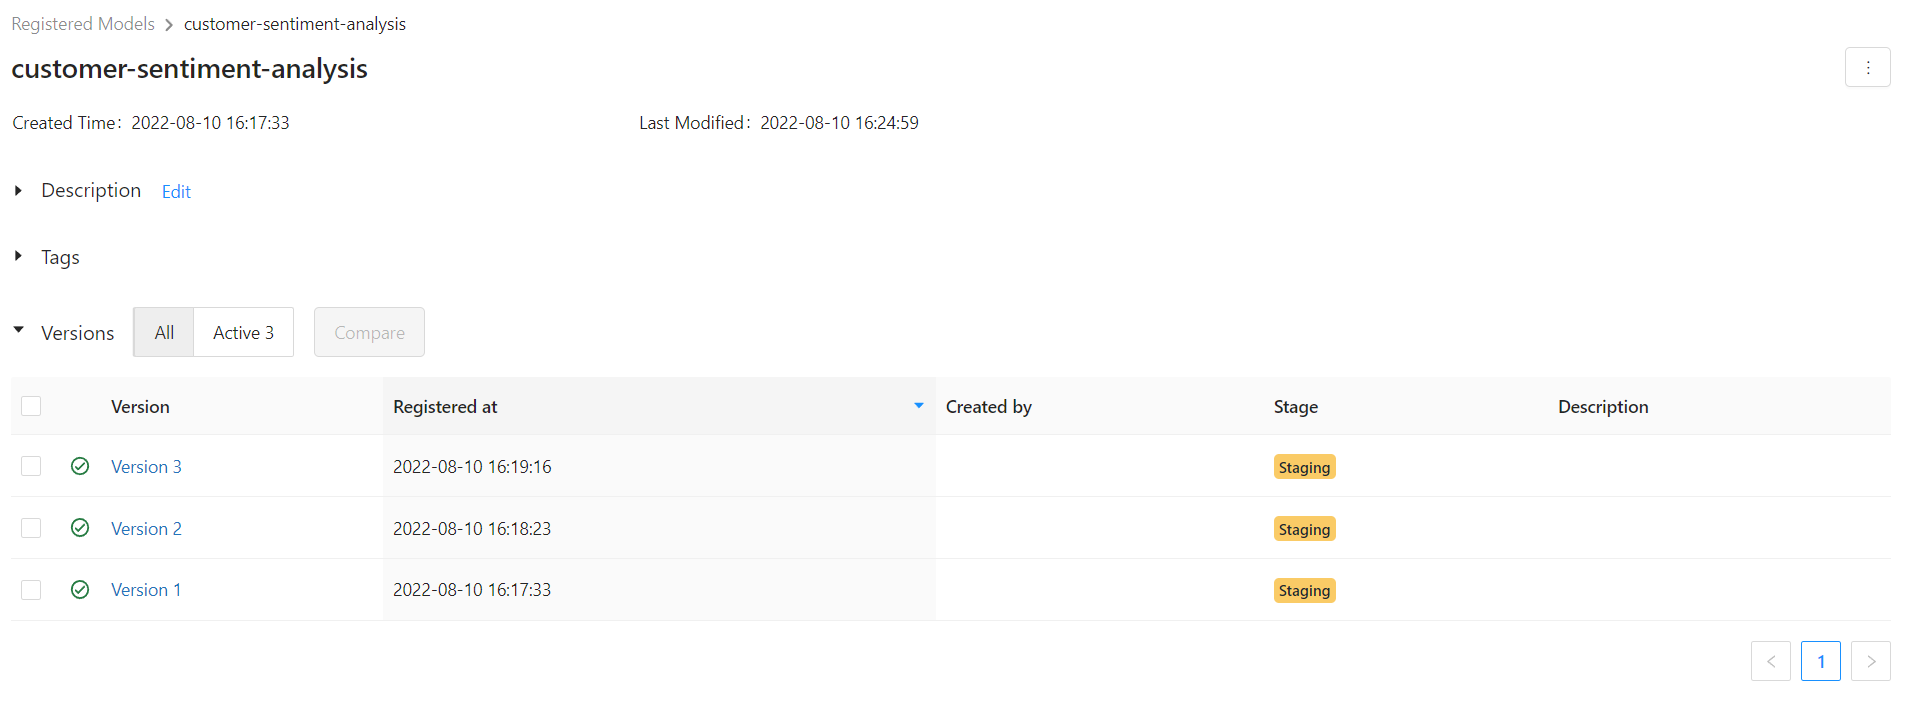
To register a model in the model registry, choose one of the runs and then the model folder under 'Artifacts'. Then, the 'Register Model' button will become visible. You must choose a model name that contains all of the versions. We created the model name "customer-sentiment-analysis" and registered three models, one from each method, based on the accuracy metric.
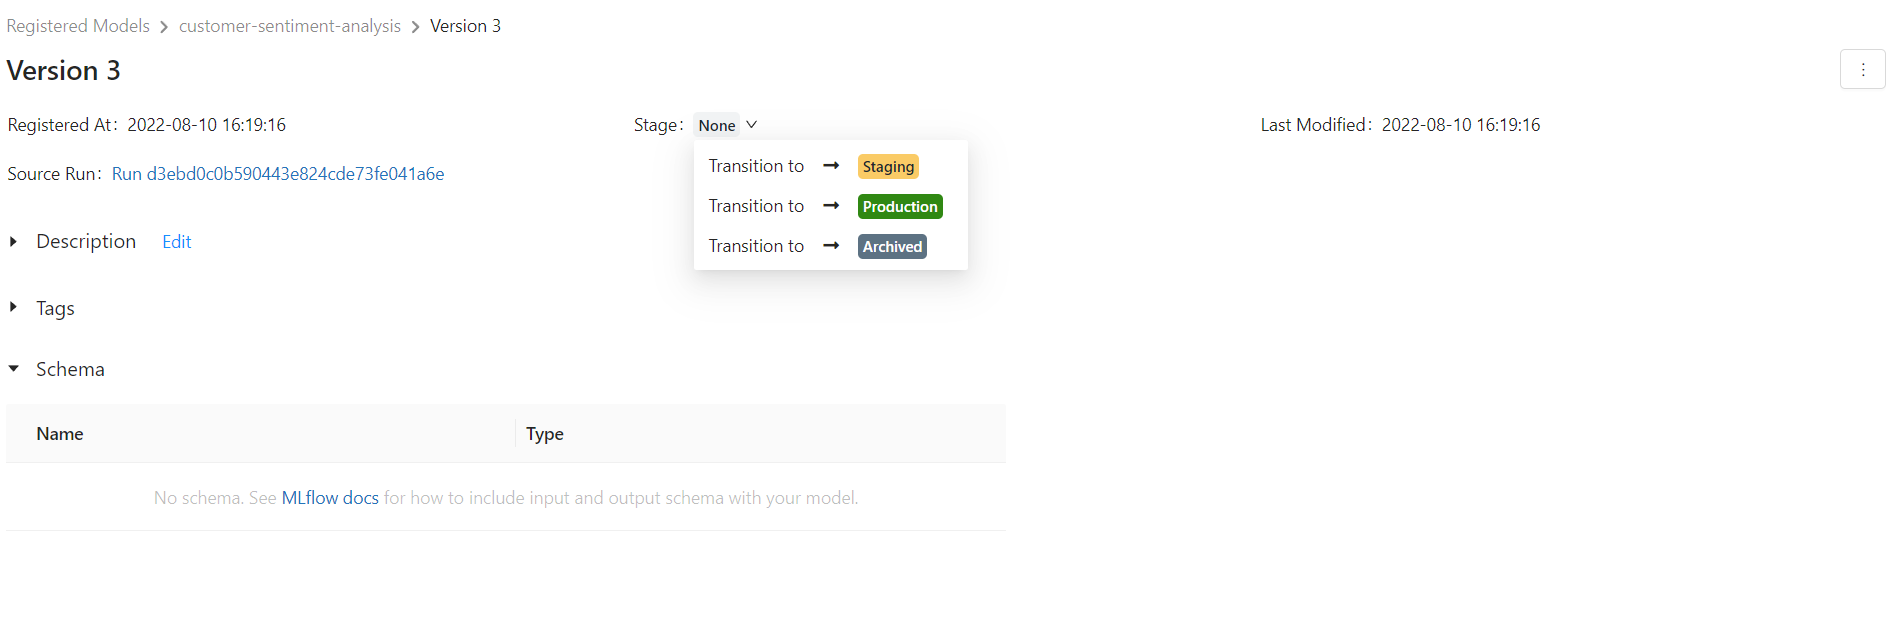
Then if you go to the Models tab on top of the screen, you will see all the versions. You can select each version and then set the stage. Here we set all to the staging state. It's a good practice to add a description about the data the stage has changed and also the name of the developer for each version.
You can also use the API and MlflowClient and do these steps in code. Check the API here and the following video for more details. I prefer the UI.
Then, you can compare models in the staging phase and choose one for production deployment. In our example, the accuracy of the deep learning model is higher, thus we advance it to the production stage. When you transition a model to the "Production" stage, the model registry simply assigns a label to that model version and does not actually deploy the model to production. Complement the registry with CI/CD code that does actual deployments.
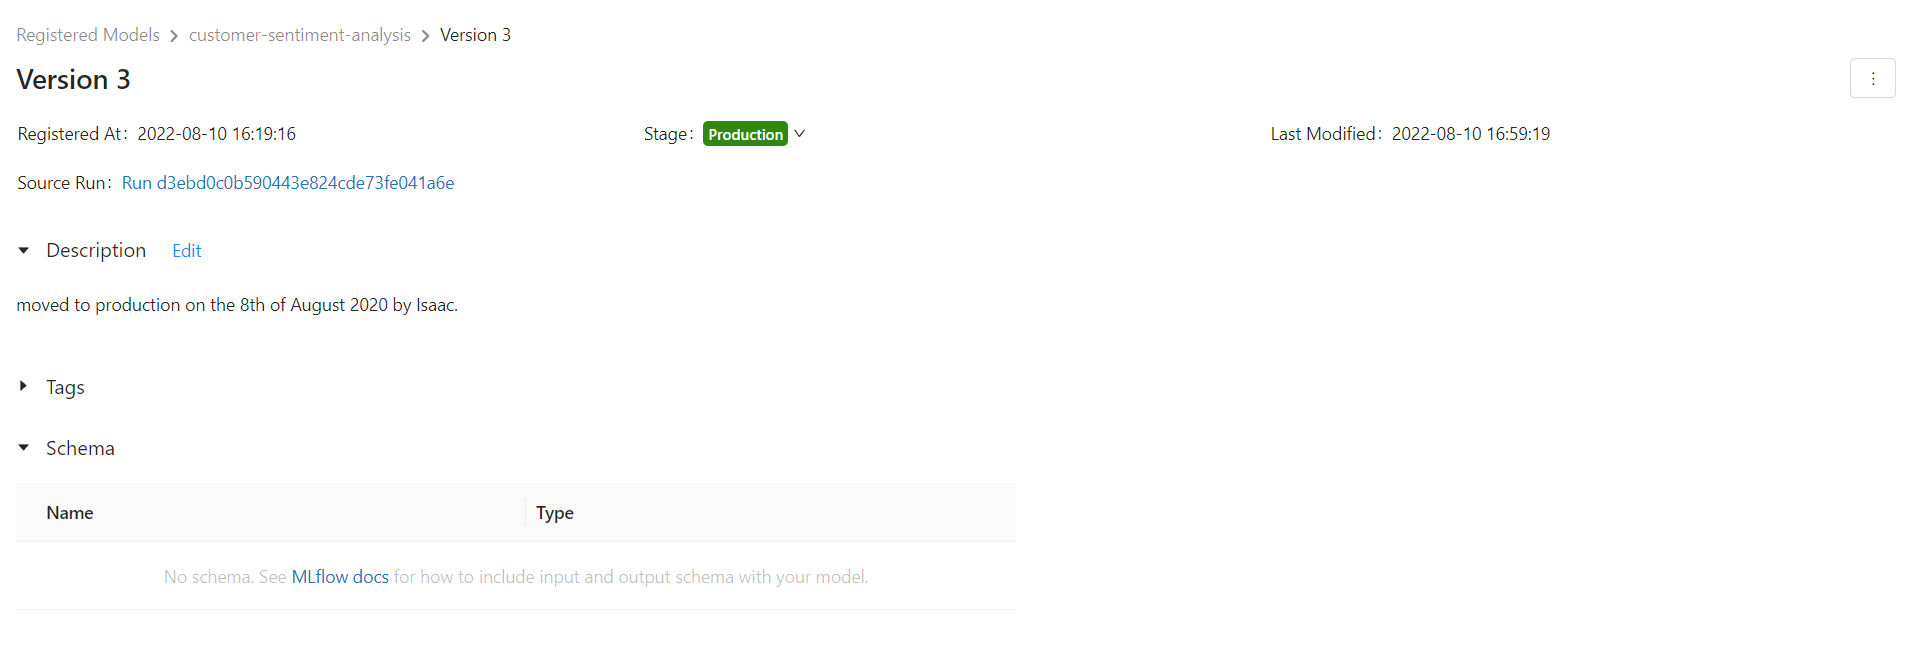
We can then use the run id for this version and download the model and other required files like the tokenizer and deploy it. In our case, we want to load the Keras model. Check the documentation for more details:
mlflow.keras.load_model(model_uri, dst_path=None)
where models:/<model_name>/<stage or version>. model_name is customer sentiment-analysis and stage is production:
import mlflow

mlflow.set_tracking_uri("sqlite:///mlflow.db")
mlflow.set_experiment("customer-sentiment-analysis")

mlflow.keras.load_model("models:/customer-sentiment-analysis/production", dst_path=None)
or
mlflow.keras.load_model("models:/customer-sentiment-analysis/3", dst_path=None)
You can set the dst_path if you want to save the model locally too. Let's also download the tokenizer:
from mlflow.tracking import MlflowClient
client = MlflowClient(tracking_uri="sqlite:///mlflow.db")
client.download_artifacts(run_id="d3ebd0c0b590443e824cde73fe041a6e", path='tokenizer', dst_path='.')
The run_id is for the model in production that we can get it from mlflow UI.
We can also read the model and artifacts from Google storage or Amazon S3. Check the documentation for more details.
You can check the following video and also my blog post to see how you can setup MLflow on AWS or GCP.
We will see more about using the model in the production stage in the next blog posts. That's it for the first blog post. In the next blog post will go for Orchestration.